A Night Out
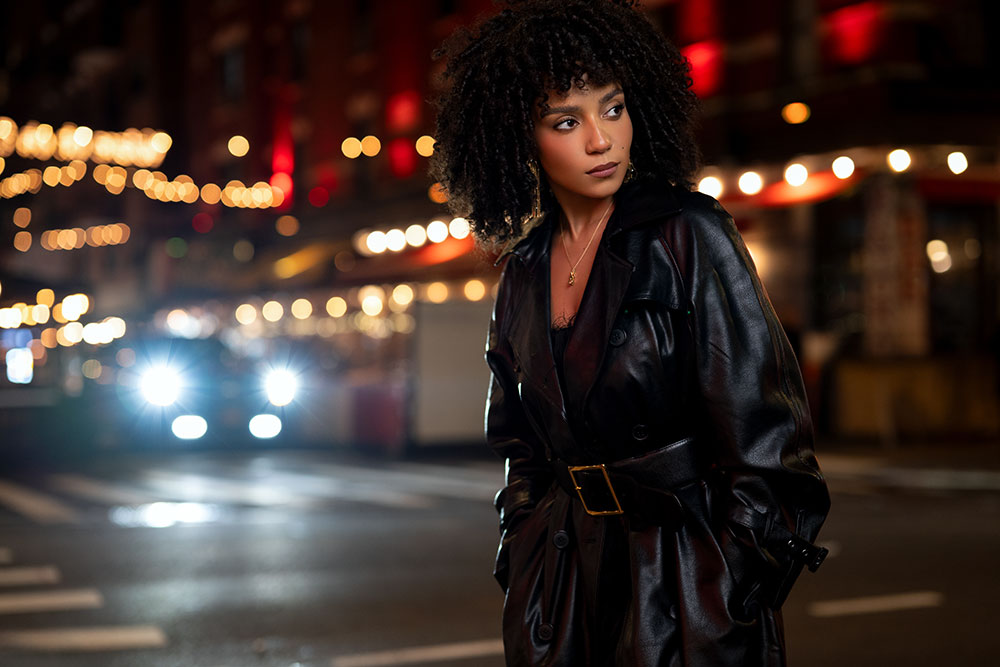
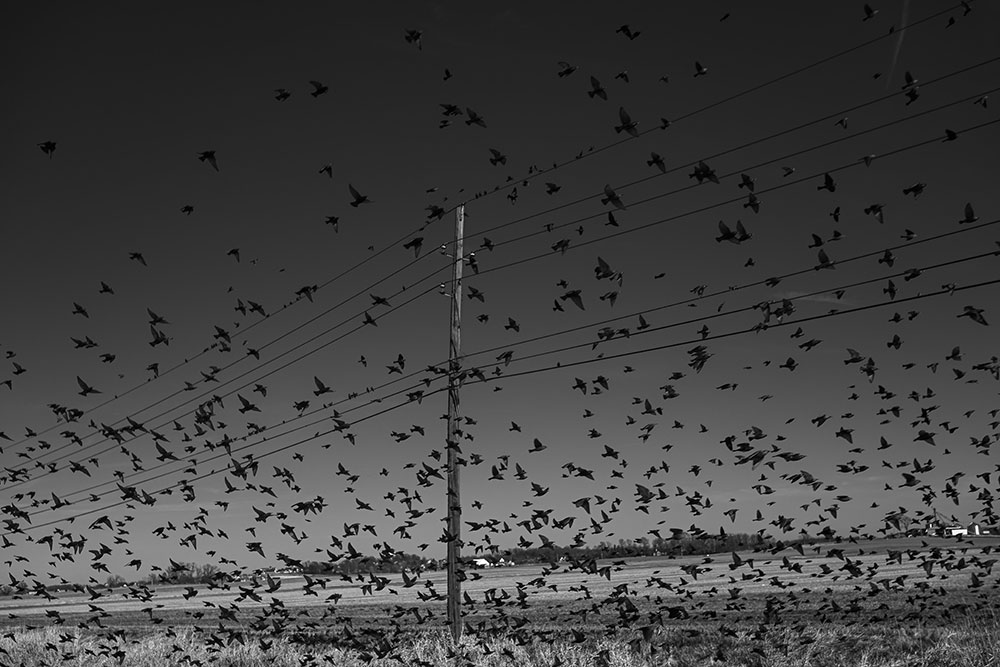
In little Italy there were lots of lights on the street and building. “I wanted it to feel like she was on the go. I waited for a car to appear on the left side of Jada to add more depth to the image and I also feathered the strobe to add some light to Jada’s face,” notes Aaron.
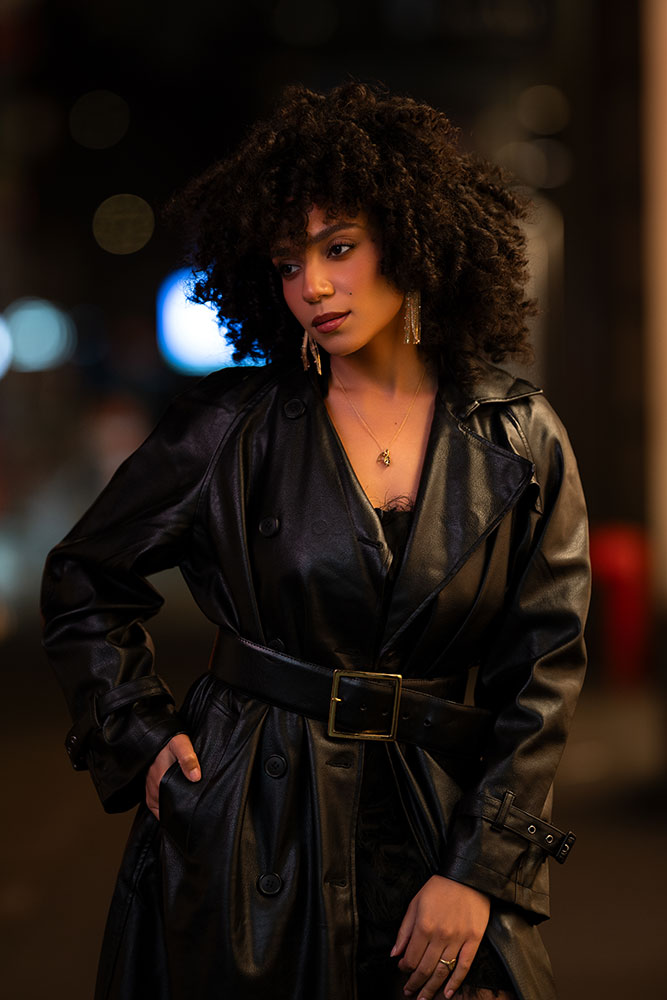
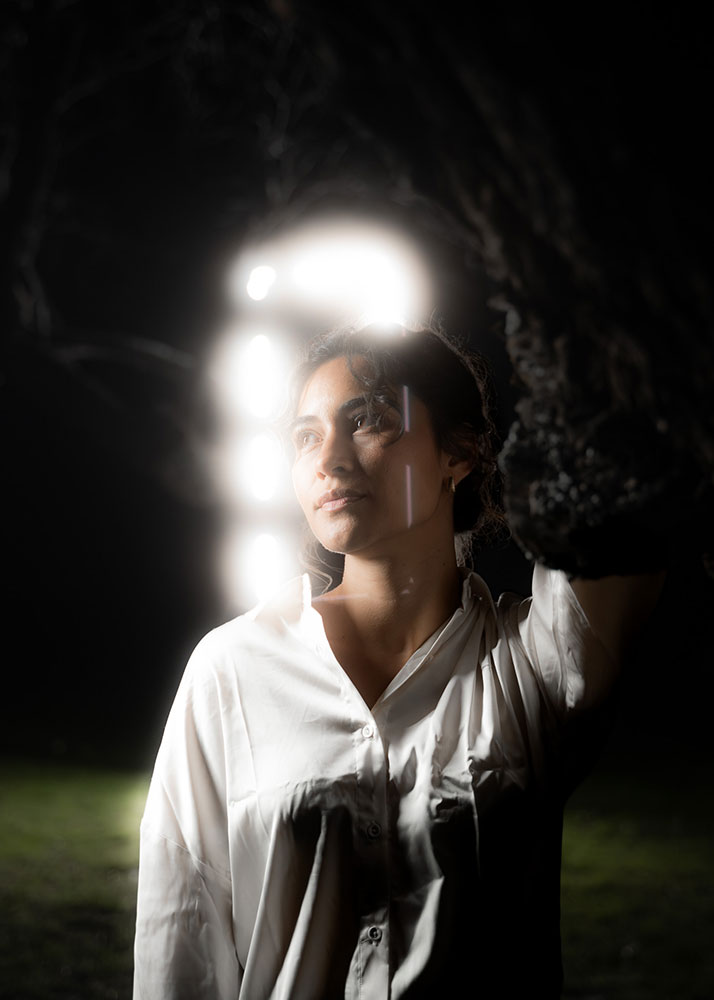
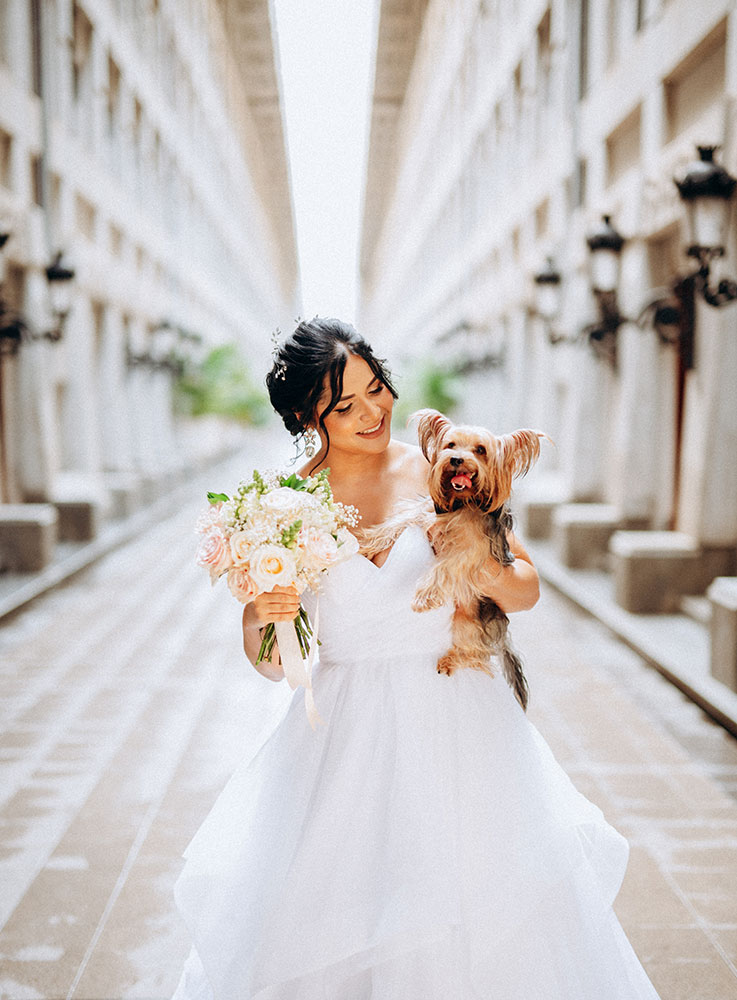
Evening Beauty. “This was one of the first shots of the evening. I placed Jada between a store front window (on her right side) and a food cart (which is to her left) and I was able to get enough light on her face and clothing to produce this shot. I just placed her closer or farther away from these two ambient light sources until I achieved the desired look you see here. Knowing that I could achieve this at night, with no additional strobes made me very happy,” explains Aaron.
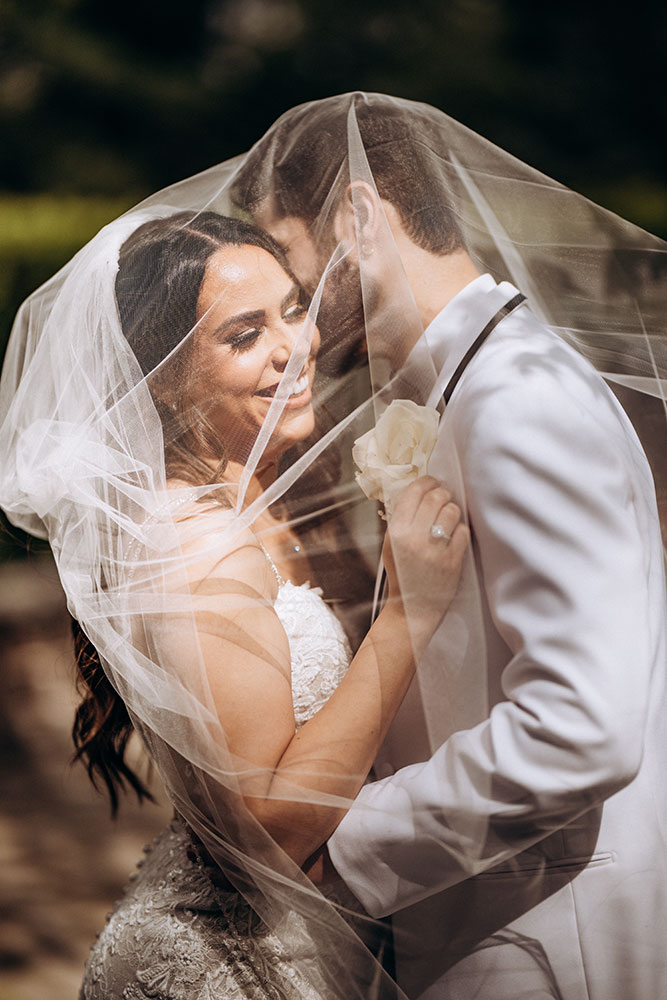
New York City–based Aaron Pegg recently had the opportunity to photograph a model using the retro-styled Nikon full-frame/FX format Z f mirrorless camera and the NIKKOR Z 135mm f/1.8 S Plena lens. Wanting to challenge himself, Aaron came up with a scenario that would test the camera’s low-light capabilities while utilizing the stunning bokeh the Plena is known for.
This was my first night shoot and I wanted to challenge myself to photograph a dark-haired subject with the quintessential New York all black outfit.
The story behind the imagery is about a young lady headed out for the evening in NYC. Aaron notes: “I knew the Plena’s circular bokeh and the Z f’s low-light capabilities would be perfect to capture these moments!”
The Z f with its retro design has been Aaron’s go-to camera choice as of late. The Eye-detection autofocus has been quite beneficial for Aaron, who often shoots in low-light conditions. “I feel like it’s very rare now that I am missing focus on a portrait,” he explains, adding, “The low-light capabilities have made it so much easier to photograph subjects in the subway and at night!”
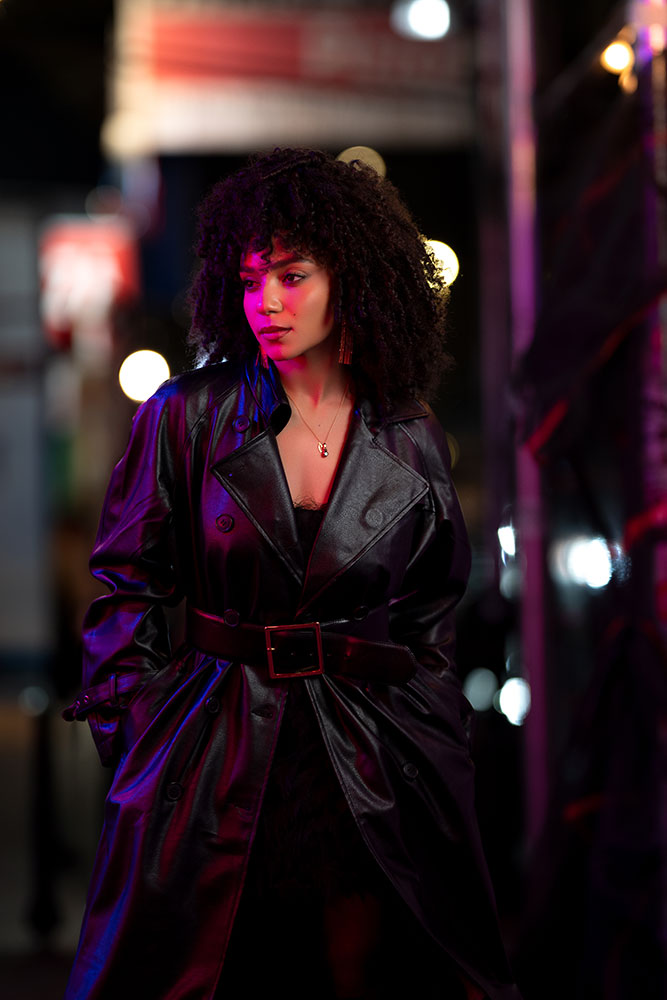
Gotham Pink. “While we were walking around Soho, I noticed a restaurant with a neon pink sign casting pink light. I thought this could be a great way to add some fun and pop of color in the image while adding to the story of Jada’s night out in NYC. So, I placed Jada under the light but it washed over her entire face, but I loved the pink lighting on her leather jacket, so I decided to place the strobe on the right side of her face so that the pink neon acted more like a side light while leaving her natural skin tone,” notes Aaron.
A Touch of Light
“Knowing that the 135mm Plena lens was going to produce some beautiful big circular bokeh, I needed to find a location in NYC that had a lot of lights in the scene and some great ‘available light’ or ambient light that I could use to light my subject,” Aaron explains. So, he searched out locations where he’d be able to use available light from a store front or food cart along with one strobe that he used to shape the lighting.
In a few of the images from the shoot, I used ambient lighting. However, for most of the images, I used a strobe with a larger softbox. The key to these images was to make the lighting feel more natural and make it feel like Jada (the model) was lit by more practical lighting in the scene, like the car headlights or lights from a store front. In order to achieve these, I had my assistant feather the light, so only part of it was hitting the subject.
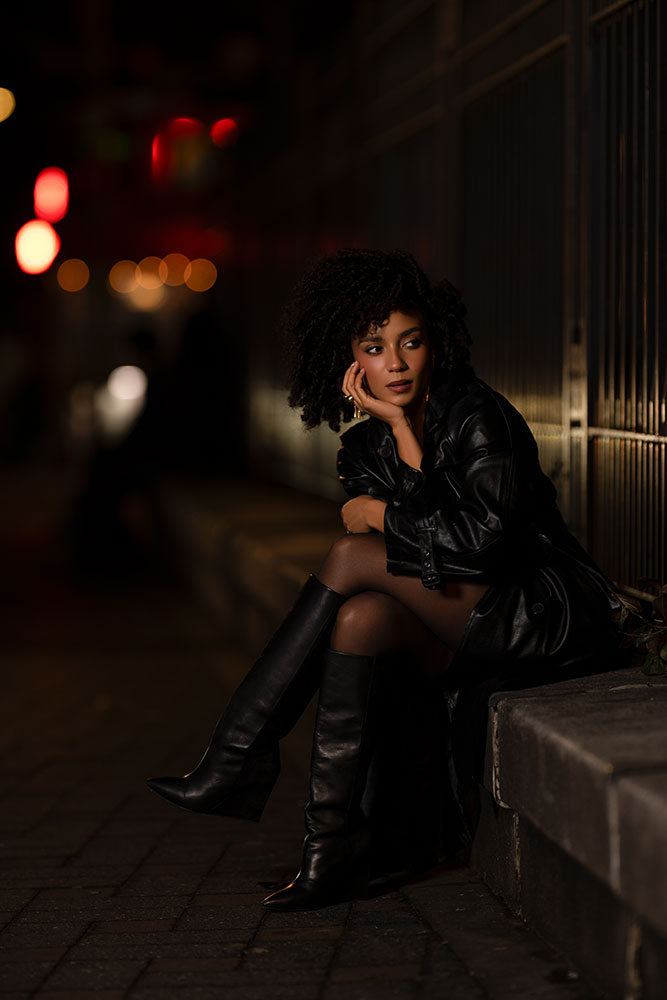
Waiting for a Friend. The car lights were reflecting against the fence. “I knew that it would add some separation with Jada sitting in front of it. I feathered the off-camera flash on the left side of Jada to add some fill light and to add detail to her face and body. I love the subtle subdued result,” notes Aaron.
One Model, Many Options
Aaron often wants to tell a story with his shoots, especially when on location—it sets the tone for both him and his models.
I think the key to getting a variety of great shots on any shoot is to be intentional. Why is the subject wearing this outfit? Where are they going? What are they doing? How do they feel? The answer to these questions will help craft how I want to capture a scene and what shots I need to tell the story fully.
But one tip Aaron suggests is to not just stick to a plan but leave room to adjust on the fly. “I like to leave room for improvisation because those candid moments can lead to new ideas and that’s where the magic lies at times,” he adds.
A Night Out In Little Italy. There were lots of lights on the street and building. “I wanted it to feel like she was on the go. I waited for a car to appear on the left side of Jada to add more depth to the image while also feathering the strobe to add some light to Jada’s face,” notes Aaron.
The Results are In
Aaron has pretty much used all of the Nikon Z series mirrorless lenses and found the 135mm Plena to be an amazing piece of glass. He concludes: “I think the compression and bokeh that I was able to achieve with this lens is like no other!”
As a young Marine, visits home for Arturo Carillo included reaching for his parent’s Nikon camera, so it wasn’t much of a surprise that when he left the military, Arturo gravitated to that camera and his passion for photography grew. The rest, as they say, is history. Not that art was foreign for Arturo—far from it. Growing up he’d immersed himself in art in all of its forms: drawing, painting, sculpting and graphic design.
Arturo says that low-light photography chose him. As a co-owner of a construction company with his dad, 12-hour workdays left little time for shooting during the day. He explains, “Often, my only option was to create at night. So, I adapted and learned to master lighting, using it as a medium to express myself. The more I experimented, the more I fell in love with the control I had in shaping scenes and photos with continuous lighting.”
Continuous lighting is Arturo’s go-to solution for illuminating a scene.
Nothing rivals the complete control that continuous lighting offers me over every scene. As an artist, I thrive on the ability to witness the final result unfolding in real-time. Continuous lighting enables me to see and adjust details instantly. This immediacy not only enhances my creative process, but also deepens my connection with each artistic vision, ensuring that every detail is meticulously crafted to perfection.
Flash photography, on the other hand, isn’t as immediate, since you need to shoot first and review the lighting on a scene on a display screen.
Colores de mi Tierra “Colors of my land”
The Art Factory is Born
The Art Factory was born from a collective group of seven strangers who, one by one found each other, to create a space where creators/creatives could come together and push their creative limits. “We had the desire to build a supportive environment where photographers could connect, collaborate, and thrive.”
The creatives behind the Art Factory understand firsthand the challenges that new artists face when it comes to accessing resources. So, they provide the space and resources that allow creators to create freely through photography meetups, workshops, photo walks and the recently added Creative Retreats. “What makes us special is that all our themes revolve around low-light and continuous lighting,” he adds.
We just hit our first year and we’re excited to announce we are now helping brands and studios tell their story through our unique storytelling and use of continuous lighting. We’ve cultivated a creative family here at the Art Factory, and now, we’re venturing beyond to empower brands to foster similar families within their own communities.
We wanted to know what drives the group behind the Art Factory.
I can speak for the entire team when I say this: every event leaves us with a renewed perspective on life. The bonds we’ve forged with fellow artists at these gatherings transcend the photos we capture and the techniques we impart. The real joy comes after the event. We see artists honing their skills and securing new opportunities, all thanks to the knowledge they gained and the connections they made with us shortly after the event.
Arturo explains, “The most rewarding feedback we receive is a simple yet powerful question: ‘When is the next event?’ Those five words fuel our passion and drive us to create the next experience.” Photo walk participants range in age from 18 through 72 years old, and they’re artists of all kinds—models, designers, photographers, videographers, business owners, and more.
The team at the Art Factory want to ensure that every individual finds something valuable, gains new insights, and leaves the events feeling like part of the family. By specializing in the art of low-light photography, he says, “We provide a platform for artists to master this demanding niche. Mastering lighting is just one of the many crucial elements in creating an image that makes the viewer feel immersed in the scene.”
Music sets your soul on fire
Events at the Art Factory
The 2-3 hour meet-ups bring creators together for collaborative photoshoots, where everyone can explore various perspectives on the same set, to ignite fresh ideas among participants.
The one-day workshops offer more personalized mentoring. Tailored to meet the specific needs and interests of attendees, these workshops offer a full production setup with the Art Factory team acting as assistants to help participants realize their visions. With a maximum of six attendees, each creator gets dedicated 30-minute increments to control the set while others observe and learn. This simulates the pressure of a real-time production environment in a supportive and instructive setting. The newest offering, Creative Retreats, hones in on all aspects of being a creator. They are 2-4 day getaways focus on storytelling, landing dream brands, effectively managing social media, and balancing life as a full-time creator.
Mother Nature vs the World
Doors Opening
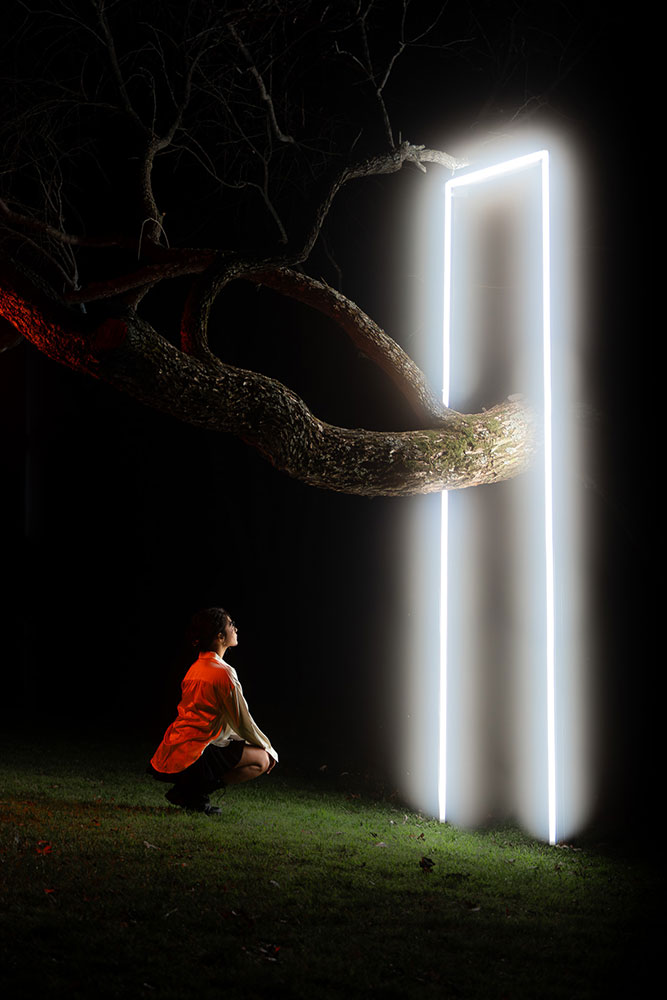
The LED Door photos drew inspiration from an anime showcasing a mysterious door standing alone in a grassy field. To create the image, Arturo constructed a door frame out of 2×4’s that he attached light tubes to. “I wanted to convey the resilience of nature compared against technology,” he explains. The door frame was then elevated above a low laying tree, which created the illusion of the tree breaking through the door. “This project symbolizes the harmony between natural beauty and technological advancement, urging viewers to contemplate the coexistence of these seemingly different elements,” he adds.
Reconnecting with Nature
Slow is Smooth, and Smooth is Fast
In a world that moves so quickly, especially due to social media, one thing has stayed with Arturo from his military days: “’Slow is smooth, and smooth is fast.’ This saying serves as a powerful reminder that each of us is on our own unique journey. We often compare our success to others on social media and feel the pressure to move just as quickly, if not faster. Remember, ‘Slow is smooth, and smooth is fast.’ Embrace your own pace and trust in your process.”
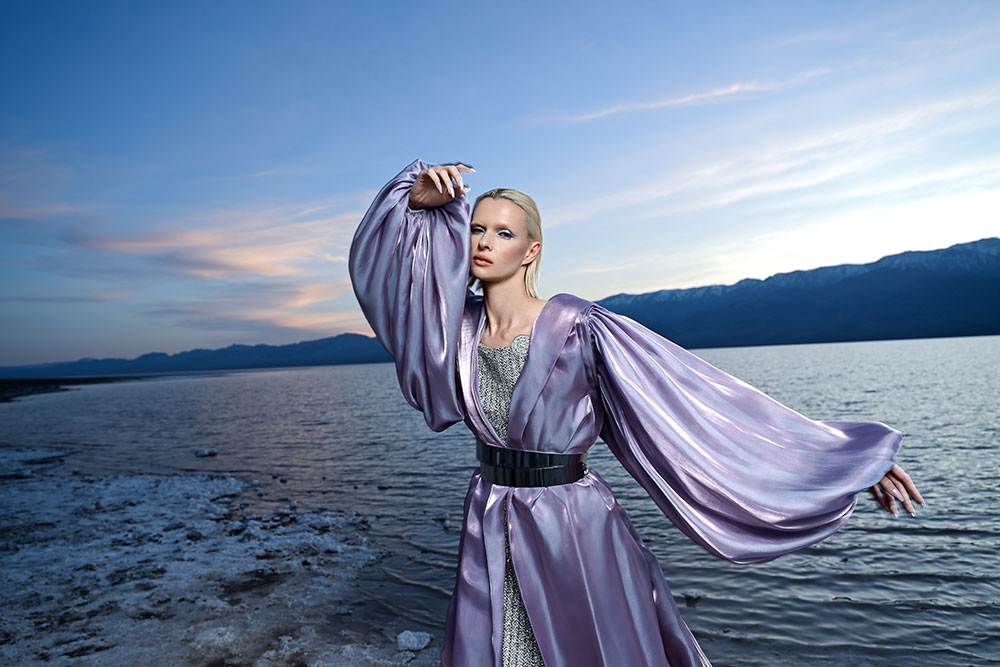
This moment felt magical. We knew we were getting great shots and I wanted to capture the gown in motion against the beautiful sunset and mountains.
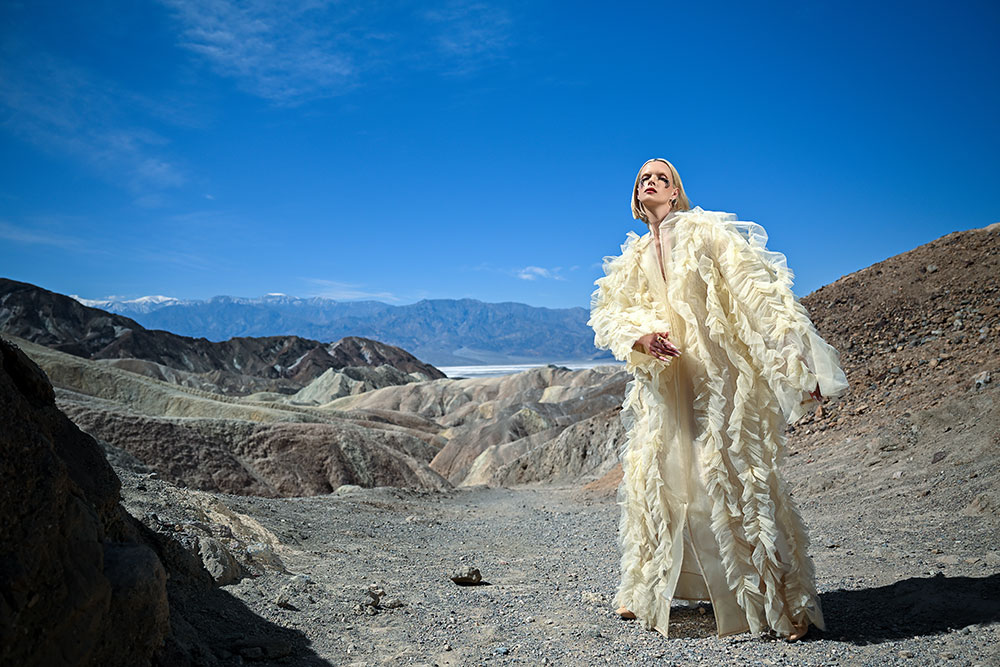
This was the first look that we captured on the shoot, so it’s morning light. I wanted to give a feel of the model Alyona being on a different planet.
Joyce Charat is a fashion photographer and director with a distinctive visual style. Her first camera was “a pink COOLPIX” borrowed from her mom, which she replaced with a D5600 before upgrading to a D850, and ultimately switching to mirrorless with the Z8 and Z6III. In this interview, Joyce gives us a behind-the-scenes look at a high-concept photo and video shoot with the Z6III and describes how she and the camera got on in the tough conditions of California’s Death Valley.
This image was from our second outfit of the day. It was such a beautiful and stunning view, I wanted to capture the details of the background as well.
Joyce’s work is characterized by motion, bold colors, unconventional framing and a distinctive hyperrealism, often created using very wide focal lengths. What lenses and lighting equipment does Joyce reach for to create her “signature look”?
My core lens kit consists of three lenses. The NIKKOR Z 24-70mm f/2.8 S, an adapted (using the Nikon Mount Adapter FTZ) Nikon AF-S Fisheye NIKKOR 8-15mm f/3.5-4.5E ED and the NIKKOR Z 14-24mm f/2.8 S. The 24-70mm is an essential, super-versatile lens, while the 8-15mm lets me distort people and make them appear tall and powerful. The 14-24mm is perfect for times when my client doesn’t need such an extreme “fish-eye” effect, but I still want to add my signature style. Lighting is so important—it’s what really elevates my images. My main kit consists of Profoto B10X Plus strobes, bounce boards, and some modifiers.
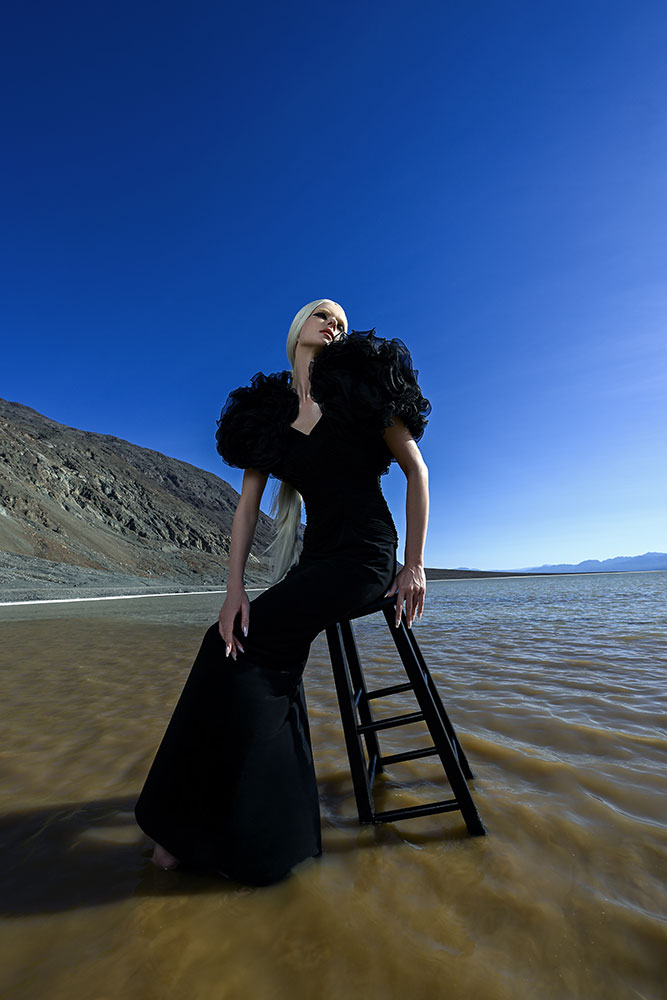
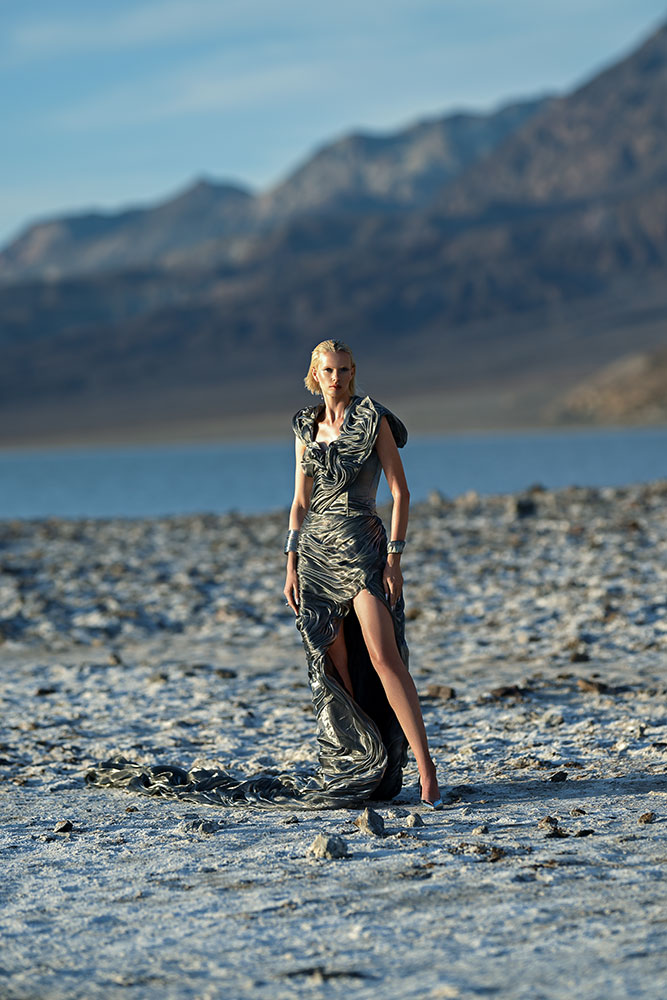
This was shot in a salt lake in the middle of the desert in very harsh conditions. We had to be efficient and shoot quickly so the model’s dress didn’t stain white due to the high concentration of salt in the water.
The Z6III comes with a suite of powerful features such as 6K/60p internal RAW and Full HD/240p video, and new hardware including the brightest electronic viewfinder of any mirrorless camera. Joyce explains the concept behind the stunning imagery that she created for the Z6III launch campaign, and how the camera’s advanced features and powerful performance helped her get the results she wanted.
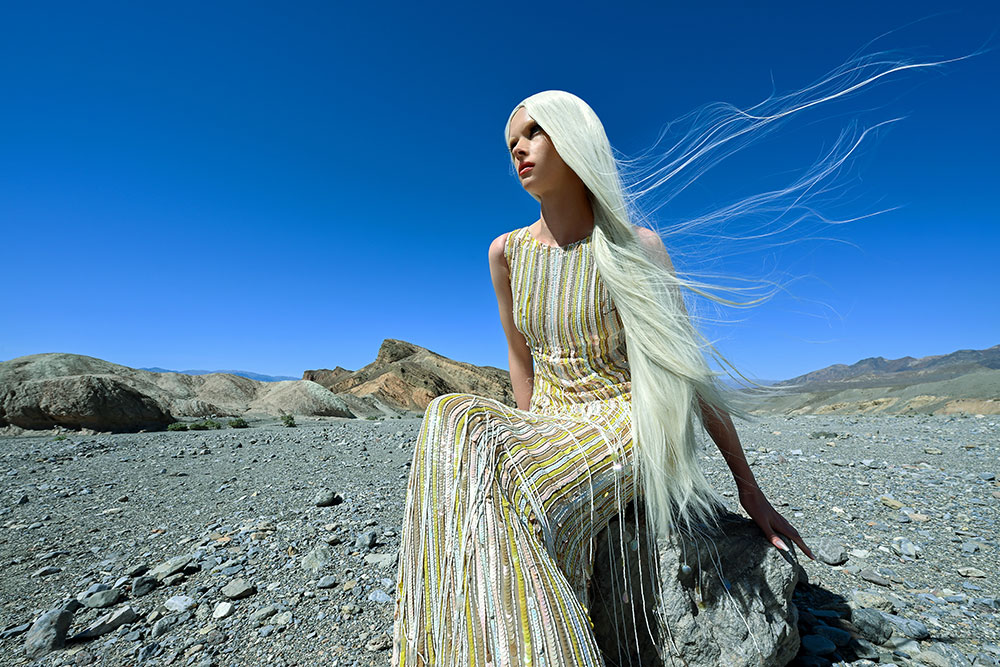
This was captured during the hottest part of the day, where the sun was the brightest. I decided to use a wind blower to blow the model’s hair and add more dimension to the image.
I wanted to create a surreal and dreamy world to contrast with the beautiful avant-garde costumes. My goal was to evoke a sense of freedom, disorientation and escape—really bringing the viewer to another planet.
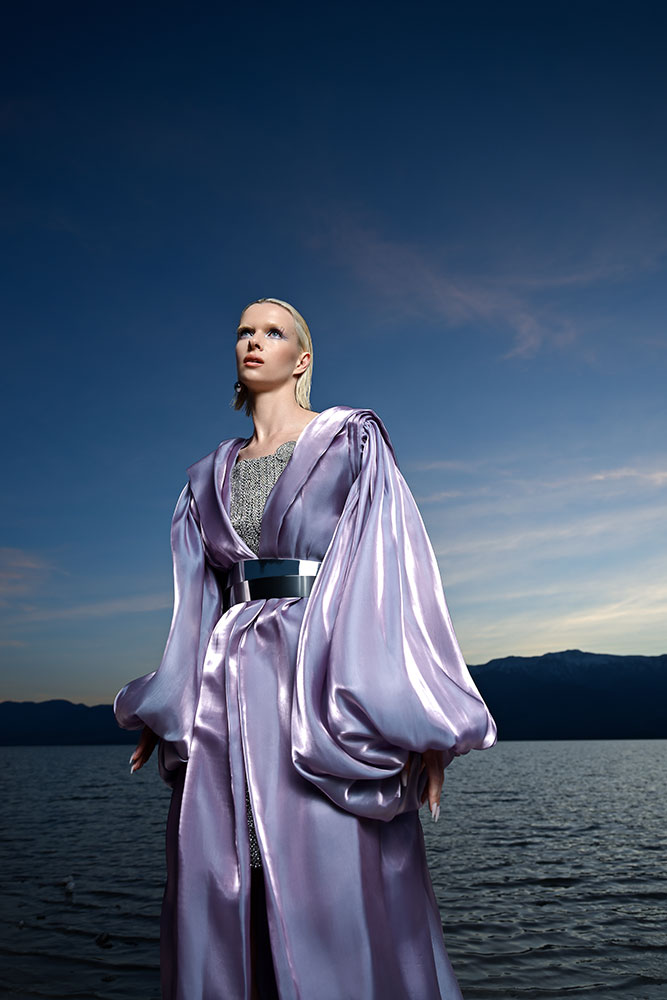
This image was the second to last look. We were racing against the sunset to make sure we got every shot we needed. I used a strobe to make the beautiful fabric of the gown stand out.
Shooting in such an extreme desert environment is very challenging. We were working for almost 12 hours in very hard conditions—from the cold of dawn to the heat of the day, with no shade, and the Z6III was incredible. The viewfinder stayed clear and detailed even in the incredibly bright sunshine, which was amazing. I like to capture a lot of action, and I had the idea to blow big bubbles then film them in slow motion. The Z6III’s new Full HD/240p video mode ended up delivering even better quality than I’d expected, and we didn’t experience any overheating, even in such a hot environment. Full HD at 240 fps is amazing and allows me to get creative shots I would not be able to get on the Z8 or any other Nikon camera. It’s unique. I’m planning a fashion editorial involving water and flowy dresses and shooting it all in 240 fps slow motion!
This moment felt magical. We knew we were getting great shots and I wanted to capture the gown in motion against the beautiful sunset and mountains.
When I was working with the Z6III, I was surprised by how light and compact the camera felt. Both my Z8 and the Z6III are so much faster than the D850. Switching to mirrorless was life changing for me. I’m able to do so much more now, in both stills and motion, with a lighter and faster body.
This was one of my favorite looks of the day. I used the NIKKOR Z 135mm f/1.8 S Plena for the first time, and it created beautiful bokeh against the golden hour and warm mountains.
Shooting in the extreme conditions of the Californian desert with a large crew and a completely new camera was a challenge—Joyce reflects on the experience:
I was nervous about working with a brand-new camera that I hadn’t used or tested before the shoot—I just knew I wanted to create my best work. But when we wrapped, I remember looking up at the sky and snowy mountains as the first stars started appearing and telling myself “We really did it”. I felt very grateful. I’ll never forget that incredible day. It truly felt like a project created out of love and passion, and it brings me so much joy to see a project go from my imagination to reality.
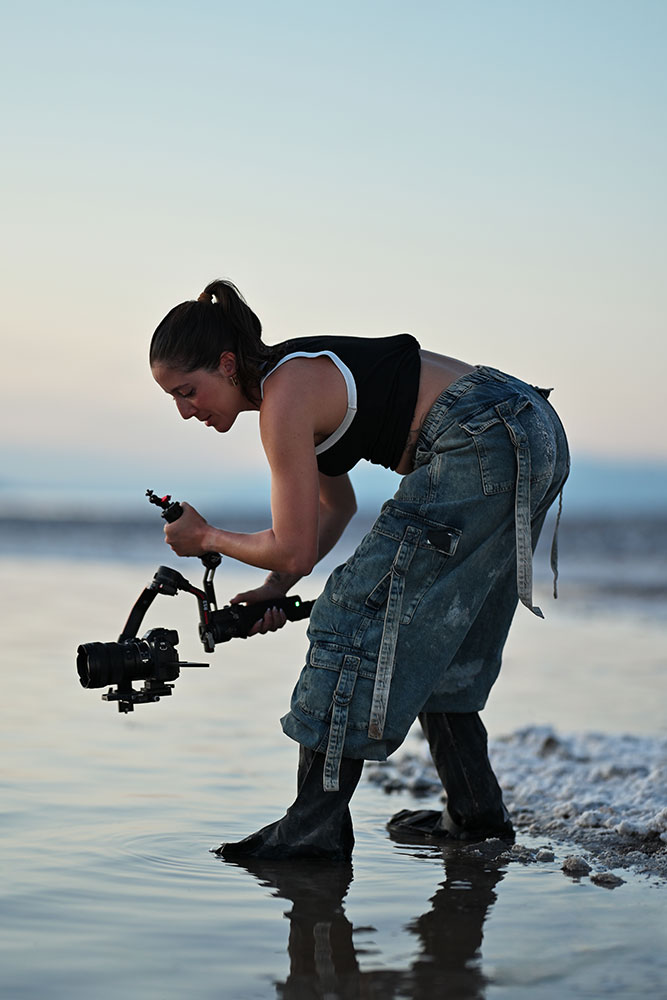
Joyce Charat shoots with the Z6III mirrorless camera on a gimbal, standing in the salt lake in California’s Death Valley.
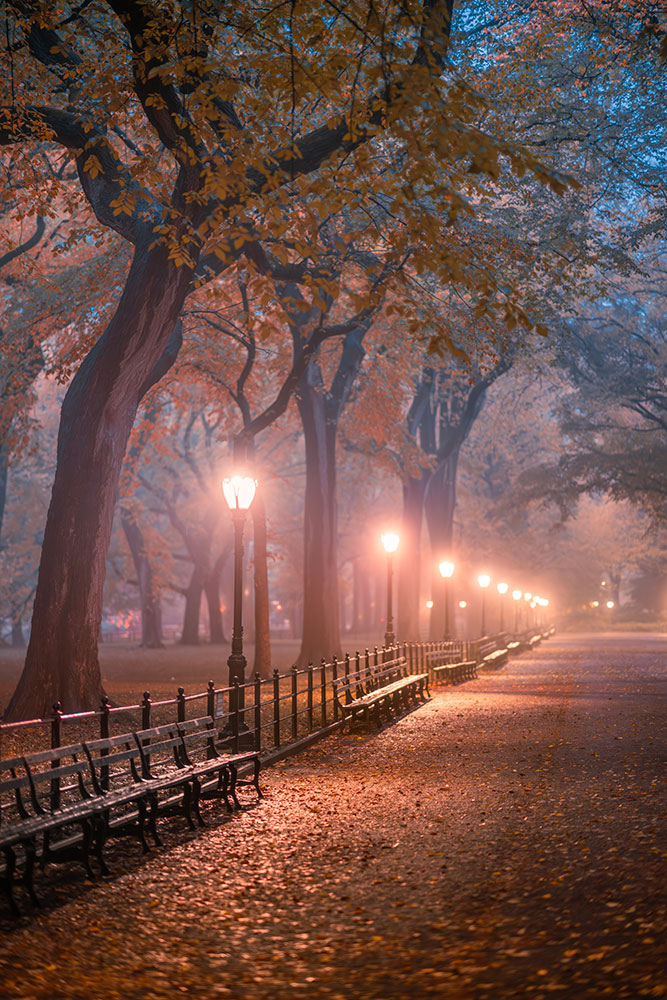
The Mall, Central Park, NYC. Brittany notes that she loves how the Central Park Mall when it is drenched in amber light after dark. The combination of the thick fog and golden fall leaves accentuated the mood, making for an eerie and mysterious scene, with the viewer’s eye drawn along the leading lines of lights and trees into the unknown.
Through creator Brittany Eliza Kunkel’s eyes, the urban Manhattan landscape is transformed into ‘dreamscapes’ overflowing with emotion and intrigue. Brittany uses the environmental elements to stir up emotion and mood in her images.
Using weather to your advantage
While inclement weather may hold some photographers back, I find that’s the time I reach for my camera the most. Rainstorms, snowstorms, and fog are some of my favorite conditions to shoot in because of the ethereal and mysterious atmosphere these elements have the power to create.
Brittany also uses the elements to enhance the scene in front of her camera.
Mist and snow act as natural diffusers, resulting in soft light and dream-like auras, as well as creating more separation and depth between layers of a scene.
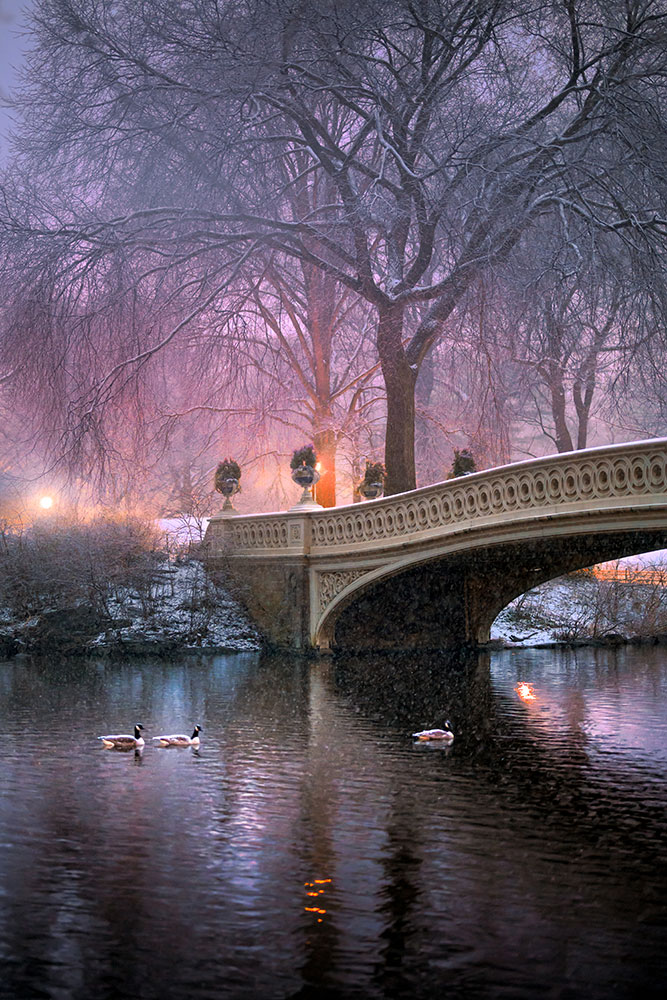
Bow Bridge, Central Park, NYC. This was captured during a serene snowstorm walk through Central Park early one morning before sunrise. Brittany elegantly depicts the enveloping stillness and serene tranquility she felt as the first to wander the snowy path.
The most colorful time of day
Her favorite time of day is blue hour—just before sunrise or just after sunset—which lend itself to soft, magical light and quiet moments of introspection. She adds, “I love how a cool blue cast on a landscape can be juxtaposed with warm details from amber-tinted streetlamps or glowing windows of a farmhouse to invite the viewer in.”
My go-to color palette is filled with delicate pastels and dreamlike hues, as if viewing the world through rose-tinted glasses. My goal is to spark viewers’ imagination and sense of wonder, giving them a glimpse into a whimsical world where reality blurs with fantasy.
The Mall, Central Park, NYC. Brittany notes that she loves how the Central Park Mall when it is drenched in amber light after dark. The combination of the thick fog and golden fall leaves accentuated the mood, making for an eerie and mysterious scene, with the viewer’s eye drawn along the leading lines of lights and trees into the unknown.
Seeing with a painter’s eye
Brittany’s background is in the arts. From picking up her first Nikon camera in high school and falling in love with the darkroom process to studying fine art in college and experimenting which shaped her own artistic identity. She turned to producing videos for music festivals in her early 20s, eventually shifting gears into television editing. “I settled into a world where storytelling reigns supreme over visuals but found myself craving an outlet to express myself more creatively. Today, through my personal photography and video projects, I enjoy the freedom to explore my artistic vision without constraints,” she explains.
Brittany says, “as a classically trained painter, I’m inspired by the dramatic lighting of painters like Caravaggio and Turner, and the dreamy impressionism and pastel tones of Monet.” Because of this, she’ll construct a scene through her lens as if it’s an (almost) empty canvas and making choices on how to compose and frame based on how she’d paint the scene.
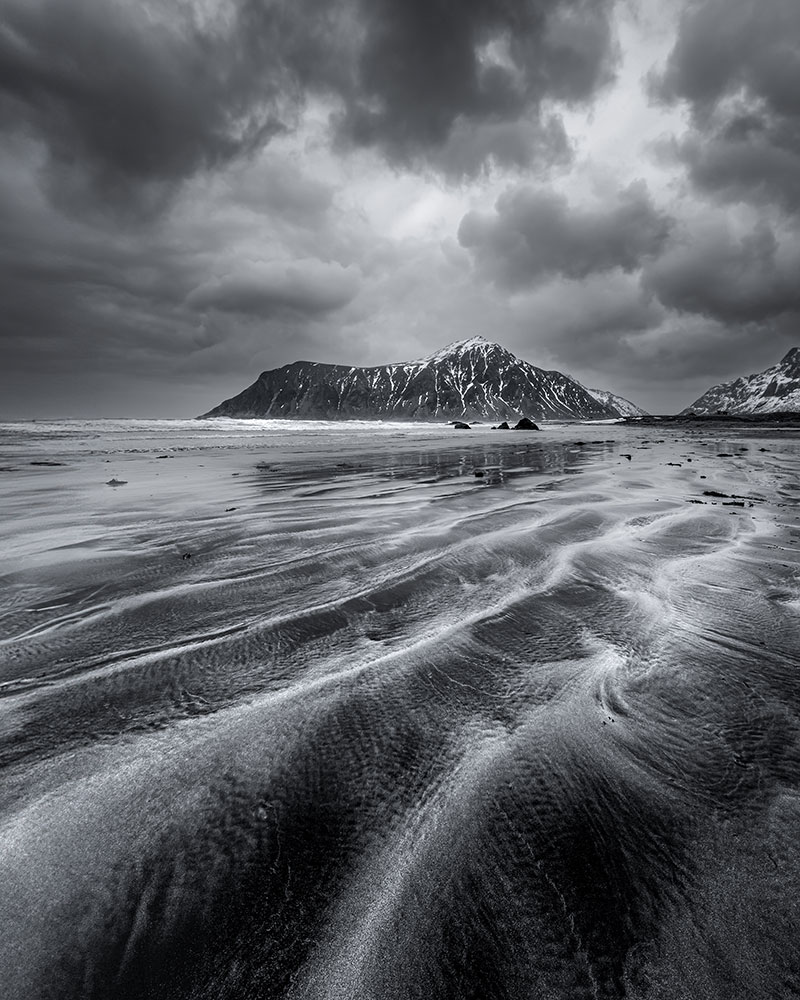
Skagsanden Beach, Norway. Brittany rarely takes or edits a black & white photo, but when she stepped foot onto this beach, she knew it was screaming for the Nikon Z f’s black & white mode, which helped to emphasize contrast in the natural patterns of the landscape, adding more drama to the scene.
I seek out light sources and shadows and reposition myself to paint with that light in order to create the right emphasis on my subject. I utilize reflections to create depth and texture, and to add a bit of abstraction and a feeling of nostalgia. I survey the surrounding area for elements I can use to build an interesting frame that directs the eye in the same way I would with a paintbrush. I use natural lens flares and prisms/crystals to craft sparkle-like texture and add a layer of whimsy.
Framing can be a useful tool to lead the viewer’s eye through an image, setting the stage for the story to unfold. All sorts of objects can be framing elements: flowers, leaves, windows, etc. Brittany explains that framing builds layers of depth in an image, to help drive the narrative. “I always hope to make the viewer feel as if they’re experiencing the magic of a scene firsthand,” she says.
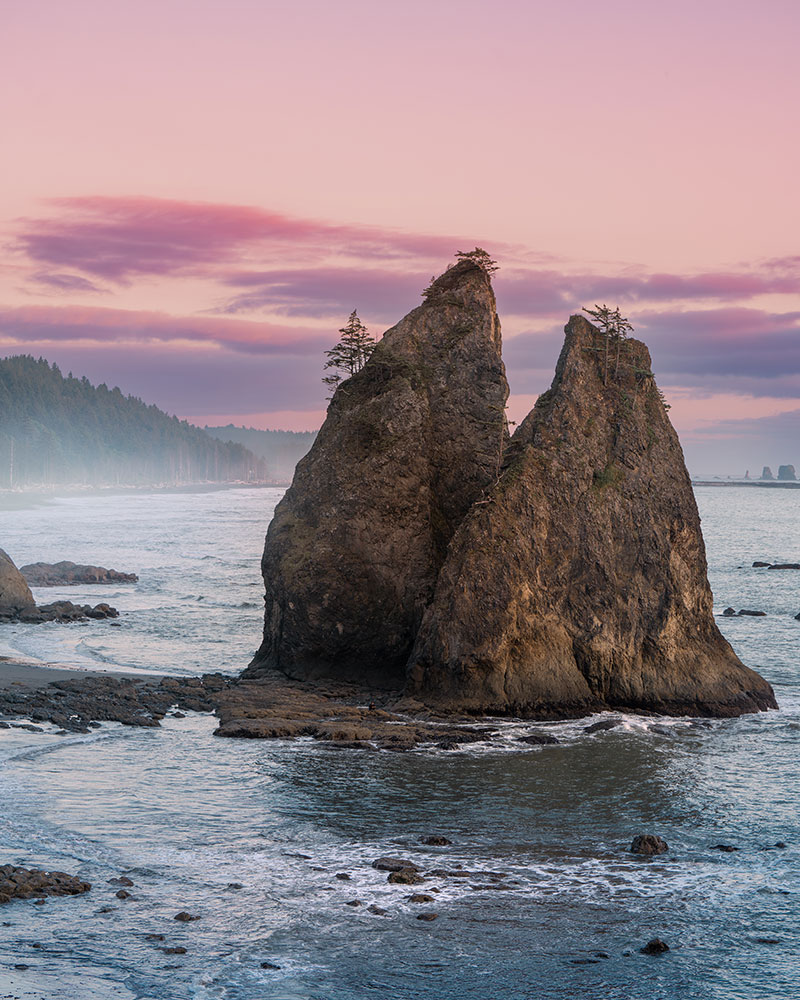
Rialto Beach, Olympic Peninsula, WA. Just after sunset, the sky filled with cotton candy tones that perfectly complemented the soft ocean mist hovering above the crashing waves. The mist helped create separation between the sea stacks and the background.
Photographing changing seasons
Fall and winter are Brittany’s favorite seasons of the year to create her dreamscapes, as the colors lend themselves well to the mood and feeling she’s trying to convey.
I feel most inspired when the rest of the world settles into hibernation. The quiet lends itself beautifully to rare moments of peace and solitude in a world where that’s often hard to find. I’ve become addicted to the rush of chasing enchanting scenes of fleeting beauty—like the vibrant hues in changing leaves and falling snowflakes that seem to float in time.
I love the rich, inviting colors of fall just as much as the cool colors of winter. While it can be easy to see winter as dull and lifeless, the right light and weather can bring out surreal, almost otherworldly blue and purple tones.
Nordland, Norway. After a week of severe storms in the Lofoten Islands and only hours left until her flight home, Brittany was desperate for one last glimpse of the Northern Lights. She set out in blizzard conditions, trekked through thigh-high snow, and waited for a brief break in the falling snow. The effort and patience was well worth it in the end!
GLOBAL WARMING “The world is getting warmer. Global warming is the gradual heating of the Earth’s surface, oceans and atmosphere. It is caused by human activity such as burning fossil fuels. Since the Industrial Revolution, the global average surface temperature has increased by more than 0.9 degrees Celsius. The rapid rise in greenhouse gases is a problem because it’s changing the climate faster than most living things can adapt to. A more unpredictable climate poses new challenges to all life,” explains Anya.
Conceptual photographer Anya Anti spent three years working on her 2.5 seconds project, from the concept stage and sourcing props, identifying locations across Iceland for the shoots, and post-production work. We asked her to share some of the images from the project as well as explaining some of her goals for the project and how she came up with the ideas and crafted the final images.
Anya’s team for this project consisted of a model, an assistant and Anya’s husband who acted as both assistant and BTS filmmaker. She and her team spent 10 days driving across Iceland, shooting in carefully researched locations, chosen specifically for each concept.
GREENHOUSE GASES “Greenhouse gases trap heat in the atmosphere and cause the greenhouse effect on planets. The danger lies in the rapid increase of these gases that intensify the greenhouse effect. These gases absorb solar energy and keep heat close to Earth’s surface, rather than letting it escape into space. By disrupting the atmospheric balance that keeps the climate stable, we are now seeing extreme effects around the globe including extreme weather events, shifting wildlife populations and habitats, rising seas, food supply disruptions, increased wildfires and a range of other impacts,” Anya explains.
Q: What does the project’s title 2.5 seconds mean?
A: “Planet Earth is 4.5 billion years old. Mankind is about 140 thousand years old. If we compress the Earth’s existence into a normal full day of 24 hours, then we’ve been on this planet for… 2.5 seconds. I used “2.5 seconds” as a title because I wanted to invoke the power of numbers and perspective to create a strong, straightforward and shocking effect.“
Q: What was your ultimate goal for the project?
A: “I hope to bring awareness about climate change, to spark conversations about the issue and to educate more people about the facts, the urgency of the crisis and the seriousness of its consequences. The project is a series of photographs that highlight the environmental crisis through metaphors and symbolism. Each one of them illustrates and represents a specific environmental issue using allegorical figures and subjects, props, costumes and natural landscapes. I hope my art will be louder and clearer than words.
The subjects either represent a part of nature that is being impacted by these issues or a collective human who is witnessing and experiencing the effects. I used body sympathetic language and sad/anxious facial expressions to convey the horror, despair, and seriousness of the issue.“
POLLUTION “Air pollution poses a major threat to health and climate. Increasing temperatures are directly linked to poor air quality which, in turn, can affect the heart and exacerbate cardiovascular disease,” explains Anya.
Conceptualization
Q: How long did it take you to complete the project?
A: “Three years total. A year of preproduction, doing research, developing the concepts for the images and fundraising. Another year was spent building and sourcing props, getting a team together and traveling to Iceland for a 10-day trip to complete the initial photography. Once the images were captured, a third year was spent selecting images and editing to create the final images for the project.“
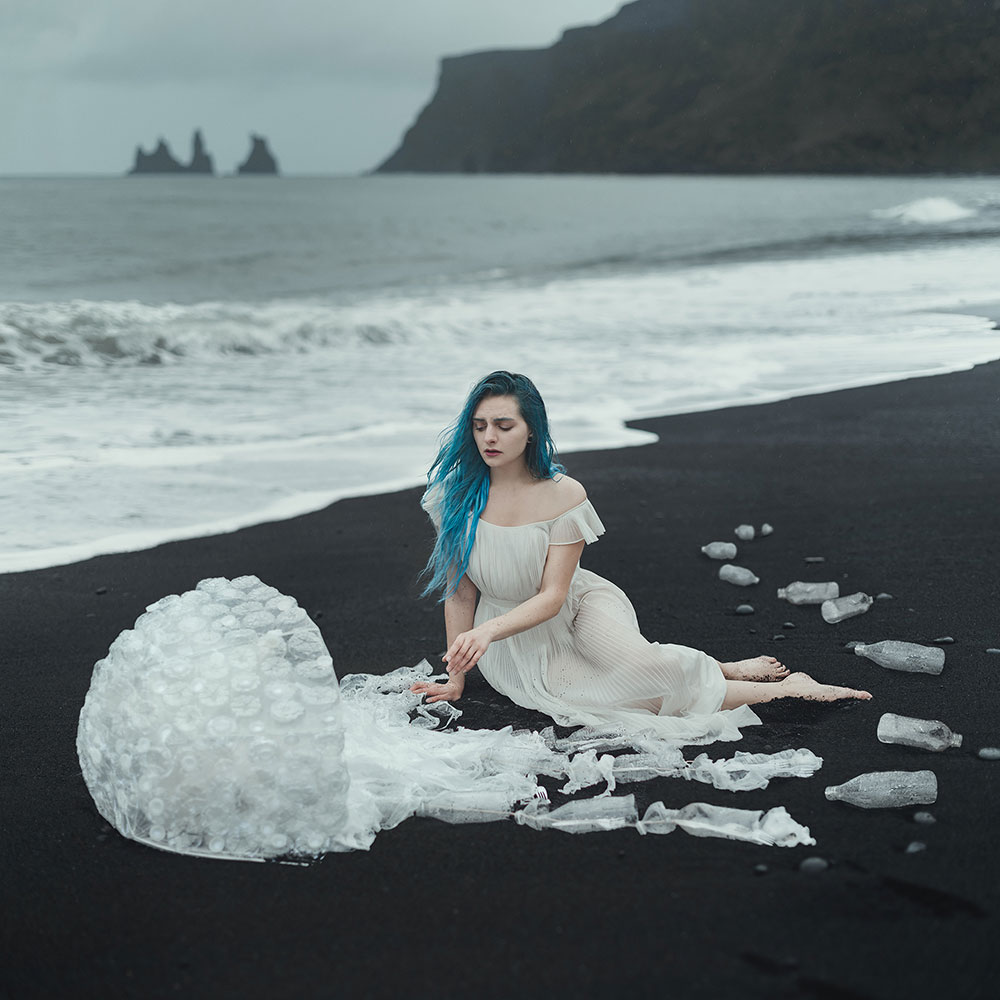
PLASTIC POLLUTION “We’re surrounded by plastic. While it has many valuable uses, humans have become addicted to single-use or disposable plastic — leading to severe environmental consequences.
An estimated 8 million tons of this plastic waste enters the Ocean every year. Not one square mile of surface ocean anywhere on earth is free of plastic pollution.
Plastic can take up to 450 years to decompose and it doesn’t biodegrade but breaks down into tiny particles known as microplastics leading to chemical contamination of the water and fish we eat. Microplastics are eaten by small marine animals and so enter the food chain ending up in human bodies!
Plastic pollution has a direct and deadly effect on wildlife, particularly marine animals. Thousands of seabirds and sea turtles, seals and other marine mammals are killed each year after ingesting plastic waste, poisoning through exposure to chemicals within plastics or getting entangled in it,” explains Anya.
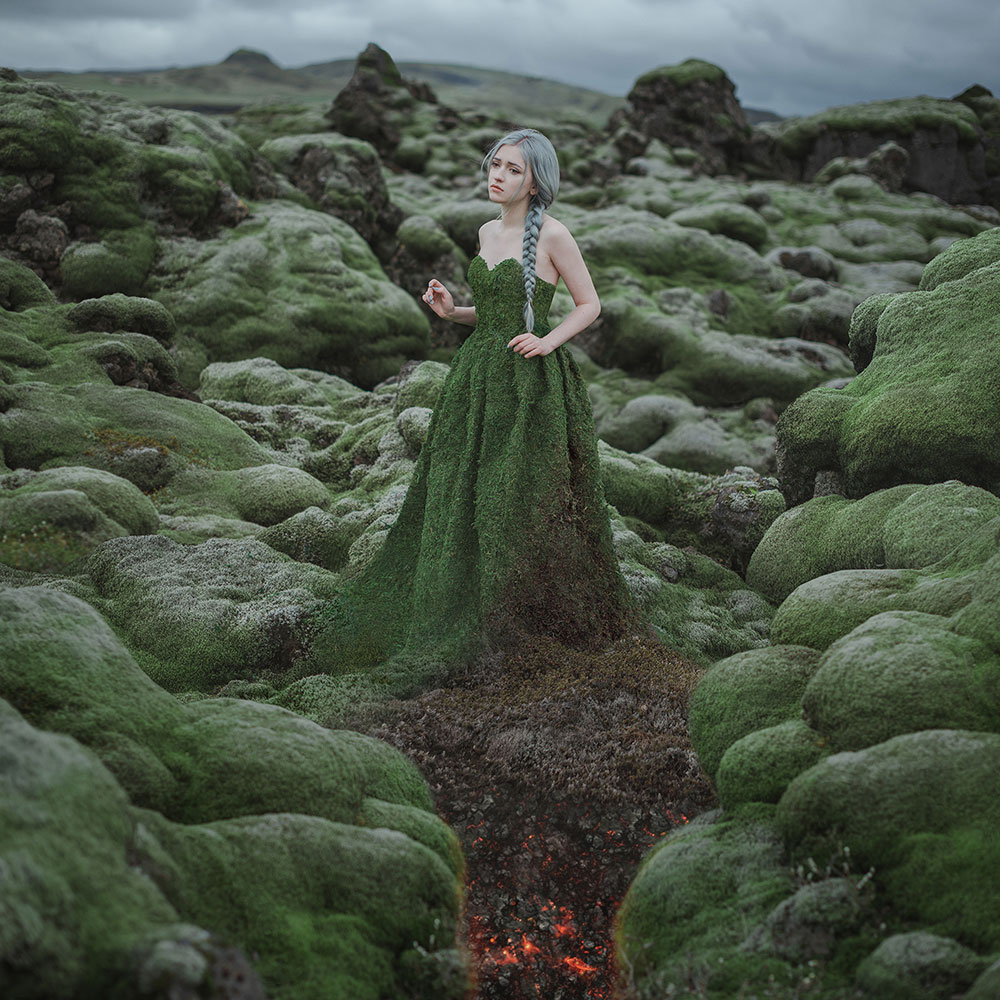
“Iceland offers a broad variety of different landscapes that were able to accommodate all of my ideas and become a vital part of the storytelling,” Anya explained. “For the “Deforestation” image I used the lava moss location to blend my subject with nature and create a sense of unity. The “Greenhouse gases” image I photographed specifically at Hverir, which is a geothermal spot in Iceland full of hot sulfuric gas—this helped symbolizes greenhouse gases.”
In the image “Greenhouse gases” she holds the planet inside a plastic bag, which is a metaphor for the greenhouse gases which create the greenhouse effect and the warming of the planet just like a plastic bag would do.
For the “Deforestation” image, she took a second-hand ball gown and crafted it to look as if it was made of moss to represent flora and forests. “I created a brown burnt dead patch on the dress along with some hot charcoals to represent wildfires and the destruction of the forest,” she adds.
For the “Plastic Pollution image” she used a clear transparent umbrella and donated recycled single-use plastic items along with making a jellyfish prop. “The jellyfish is made of single-use plastic items to symbolize the marine life that is gravely affected by ocean plastic pollution,” Anya adds.
For the “Global Warming” and “Pollution” concepts Anya commissioned an artist to make the props for the shoot. The “Global Warming” images uses a prop designed to look like a melting planet. The mask tank prop for “Pollution” was built out of the plastic fish tank and a real oxygen mask, with straps attached to be able to wear it as a backpack. She adds, “the little plant inside the gas tank symbolizing the only fresh air source.”
DEFORESTATION “Forests cover more than 30% of the Earth’s land surface and help purify water and air. They’re home to 80% of terrestrial biodiversity. Forests also play a critical role in mitigating climate change because they absorb carbon dioxide produced by human activity that would otherwise contribute to ongoing changes of climate. But forests around the world are under threat from deforestation and forest degradation due to agriculture and grazing of livestock, mining and drilling, illegal logging and wildfires. Deforestation is the second-leading cause of climate change,” explains Anya.
Q: Is the 2.5 seconds project complete at this point or do you think you might add to it in the future?
A: “The project features 8 illustrated environmental issues and consists of 13 images in total. It feels quite complete and can stand on its own. I’ve touched on all the major climate change issues that I wanted to. However, I feel like I’m not ready to end this chapter in my creative journey yet. I want to keep creating more eco-themed and environmental art, continue the conversation with my audience and explore new ideas. I’m not sure yet if they will be a part of the project or separate pieces. But I already have more photographs in progress. So stay tuned!“
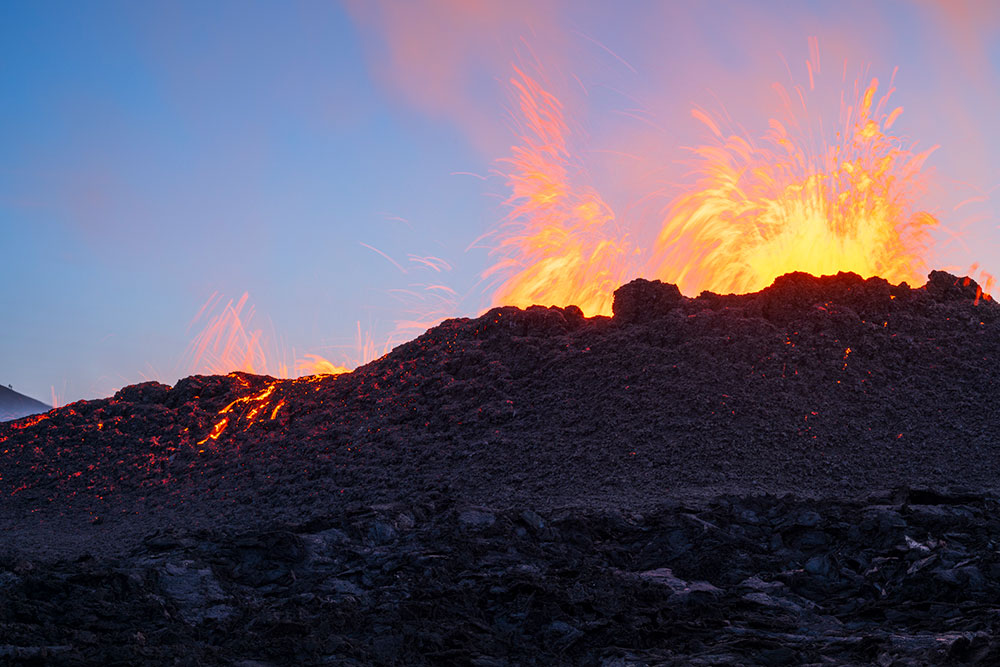
Still image of the Fagradalsfjall volcano eruption.
By Mike Mezeul II
Shooting in slow motion is a fantastic way for a videographer to bring a scene to life. From adding drama, conveying emotion, creating depth, revealing detail, and more, utilizing slow motion is a technique that you should consider for your next film project. But is it as easy as it sounds? Just simply shoot slow-motion? Well yes and no. There are definitely a few things that you should take mental note of for settings within your camera, the gear you’ll need, and your vision for the scene.
Before we get going though, let’s quickly understand what slow motion is. Slow motion is essentially the slowing down of a moment in time so that the action appears slower than in real life. This can be accomplished by either filming the moment in slow-motion or using a playback method to slow down the moment. For this article, we will aim to discuss how to film the moment in slow motion and then how to complete the process in post-processing.
Fagradalsfjall volcano eruption in Iceland.
Frames Per Second
Understanding frames per second (fps) is key to understanding how to shoot video. Most videos are shot at either 24fps or 30fps. This means that essentially (i.e. 30fps), it takes 30 single images shot in succession to make up one second of video. A good metaphor to this is thinking about a flip book. As you flip through it, it creates motion, the same technique applies for video. The more images you can capture to create a higher frame rate, the more you can slow down your video in post. It’s extremely important to know that you really want to aim to get your frame rates correct while shooting. You can technically slow down video that does not have a high frame rate in post-processing, but the video will look choppy and won’t present itself well. Starting at 60fps, you can begin slowing down motion. At 60fps, you can slow a video down by 50%. At 120fps, you can slow video down to 25% of its original motion on a 30fps timeline.
Setting FPS & Shutter Speed
When going through your “Video Recording Menu”, scroll down to “Frame size/frame rate” and click “OK.” It is in this menu where you can choose to shoot from 24fps to 120fps. Both the Z 9 and Z 8 camera bodies have the capability of shooting up to 8k 60fps and 4k 120fps.
For your shutter speed, you’ll want to try and keep your settings to nearly double that of your desired fps. For example, if you’re shooting at 120fps, you will want to aim to have your shutter speed close to 1/240 second. For scenes that are shot at 60fps, you will want to aim for 1/120 second. Now you don’t have to be exactly precise with doubling the fps, but the closer you can get to that, the smoother and sharper your slow motion will be.
Gear You May Need
Tripod or Gimbal – The goal with slow motion is to create a captivating moment that draws your audience into the scene. Having a shaky video doesn’t necessarily achieve that as the slower the motion, the more noticeable camera shake becomes. Try your best to utilize a tripod, monopod, or gimbal for shots.
Neutral Density Filter – A three or six stop neutral density filter is a great tool to have handy if you’re shooting in an extremely bright environment. This will allow you to easily cut out “x” amount of stops of light to reach your desired shutter speeds.
Additional Lighting – With faster frame rates, less light will pass through your shutter, so contrary to the tip above, you will need a way to light your subject if in a dark environment.
Cooling lava from the Fagradalsfjall volcano.
Choosing the Right Scene
Not all scenes are created equally, so thus not all scenes require slow motion. When trying to decide what fps you should use, first ask yourself what the moment is showing you. For example, scenes where you are trying to show the raw sensation of an athlete winning a championship (emotion), fountains of lava shooting up into the air (detail), or gigantic waves crashing along the shoreline (power), a 60fps or 120fps frame rate may be perfect to slow the scene and allow your audience to really indulge in it. When it comes to capturing small movements like the wings of a hummingbird fluttering away or extending the drama of a rather quick scene like a raindrop falling into a puddle, slow motion can be a wonderful way to document these moments as well. The key words here are “slow motion”, so if there isn’t much motion within the scene in the first place, there is no point in slowing it down.
Editing
Once you’ve shot your footage you won’t be able to see the video playback as slow motion in-camera. You’ll need to take your media into an editing program like DaVinci Resolve, Adobe After Effects or Apple Final Cut Pro to just name a few. Here you will be able to retime your footage to your desired speed, color grade it, and sync it to music.
Bonus Tip!
Shooting high fps scenes results in large file sizes, so make sure you have a large capacity CFexpress or SD Card that can handle the files and the required read/write speed.
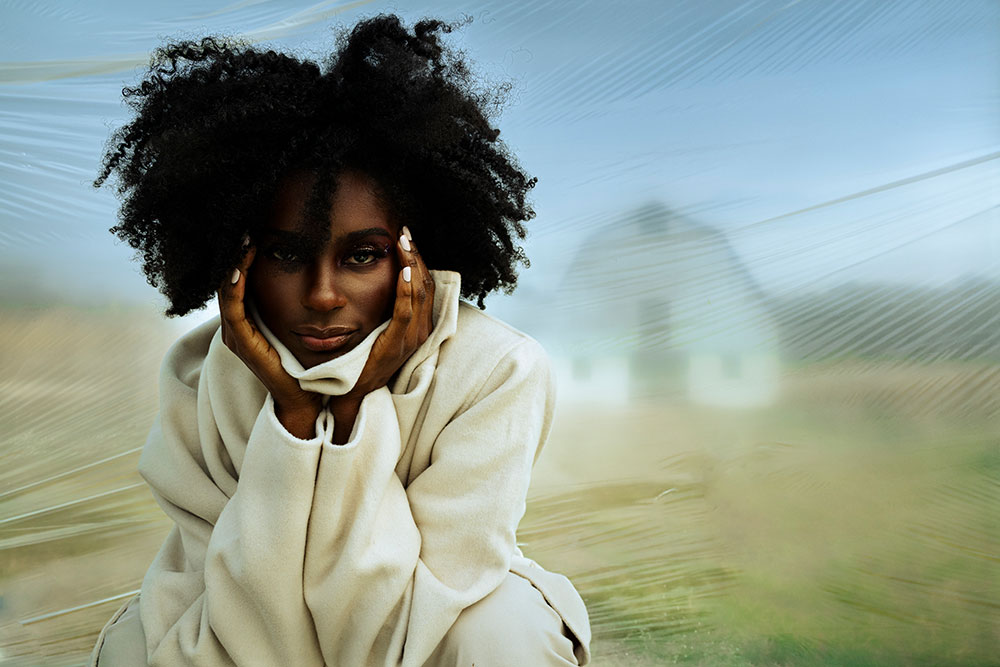
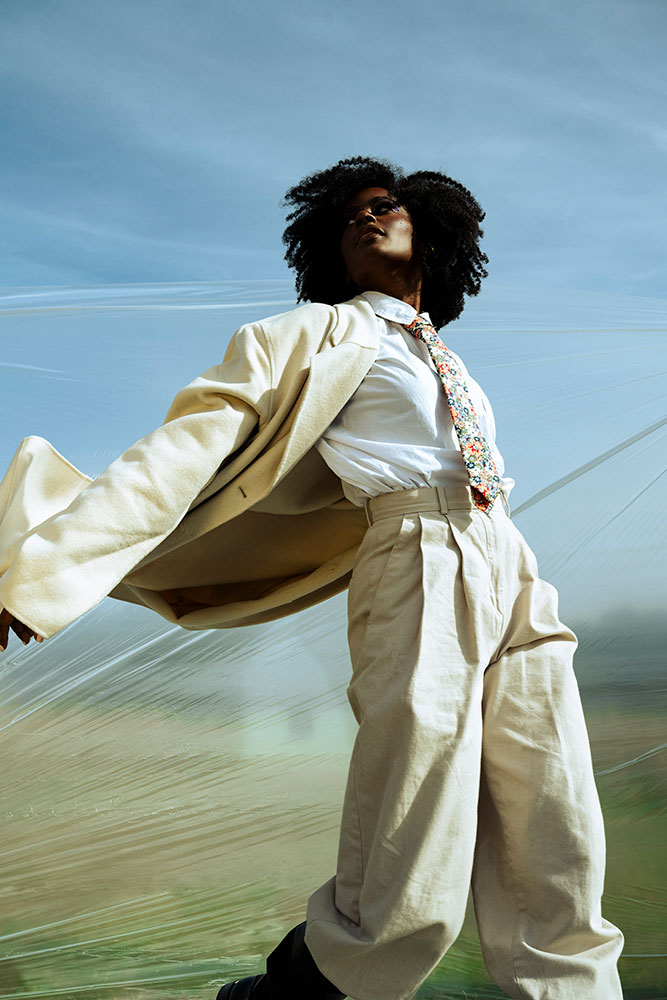
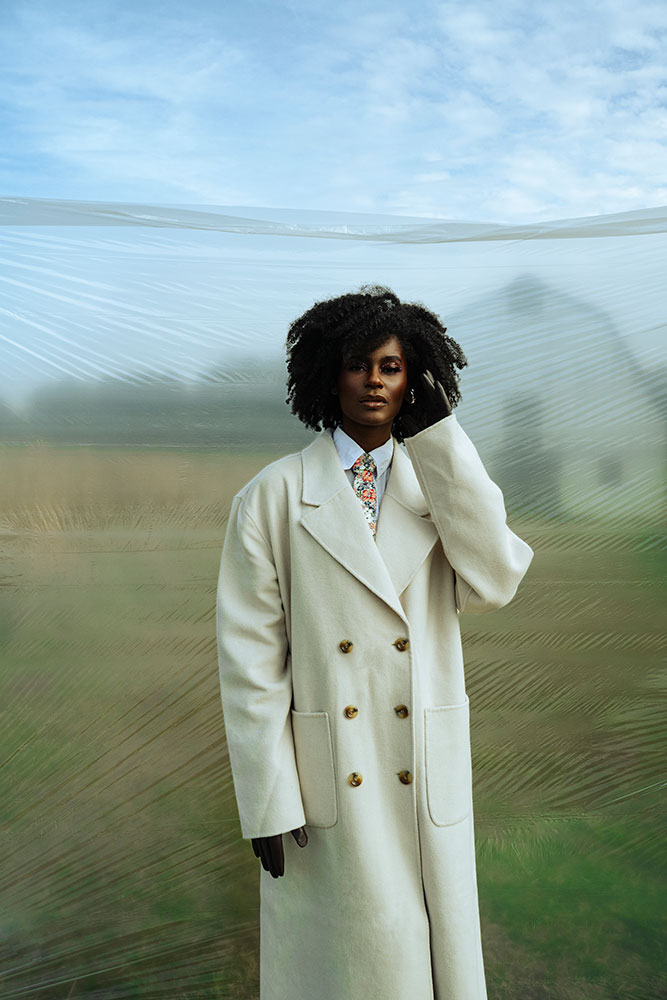
Using the translucent plastic background blurs the scene behind the model while adding texture and movement for a unique look.
Using the translucent plastic background softens the scene behind the model while adding texture and movement for a unique look.
Inari Briana had saved a “look” on her Pinterest board years back of a background look that piqued her interest. While setting up a recent shoot with the Nikon Z f mirrorless camera, she decided it was the ideal background for the location.
I wanted to try something new regarding my own style of work. I’ve always wanted to branch out and use other types of backdrops rather than the typical colored paper or textured cloth.
Inari had to figure out how to replicate the look she was after, since the original image she’d seen didn’t have an explanation as to how it was executed. She used a translucent sheet of plastic material clipped onto a backdrop stand to intentionally blur and soften the background behind the model.
The movement of the backdrop mimics the movement by the model’s pose while at the same time letting the location show through.
She explained, “I wanted to utilize the colors of my surroundings but only to a certain degree,” adding “I think the barn seeping in the background helped set the tone for the entire photo.”
Inari made images that had the translucent plastic material completely covering the scenery behind the model as well as images with a distinct edge, showing part of the altered background mixed with part of the real-life scene.
In this image, the translucent backdrop doesn’t quite cover the scene in the background, leaving a distinct juxtaposition/contrast of a portion of the sky.
In the image that the translucent material completely softens the background Inari explains, “Something about the edges not being there felt cinematic to me. Felt like we were in an entirely new space.” She went on, “The photos showing the edges (above) were unintended to be honest but brought a certain charm to the image. Because of the plastic, it felt like it was blending into the sky like a drawing.”
Upon sharing these images on her social channels, Inari was surprised when she received mixed feedback. “You don’t need to understand what’s going on in the image to appreciate it and that’s okay,” Inari says. “At the end of the day, I am very proud of my images and it spoke volumes to so many people, especially me as a photographer,” she concludes.
Like many others, Brett Brown took his interest in photography to the next level when planning a trip to Europe. Knowing he wanted to bring a camera, not just a smartphone to document the trip, he bought his first Nikon camera, a D3400. Brett was hooked on not just taking photos but reviewing and editing them as well.
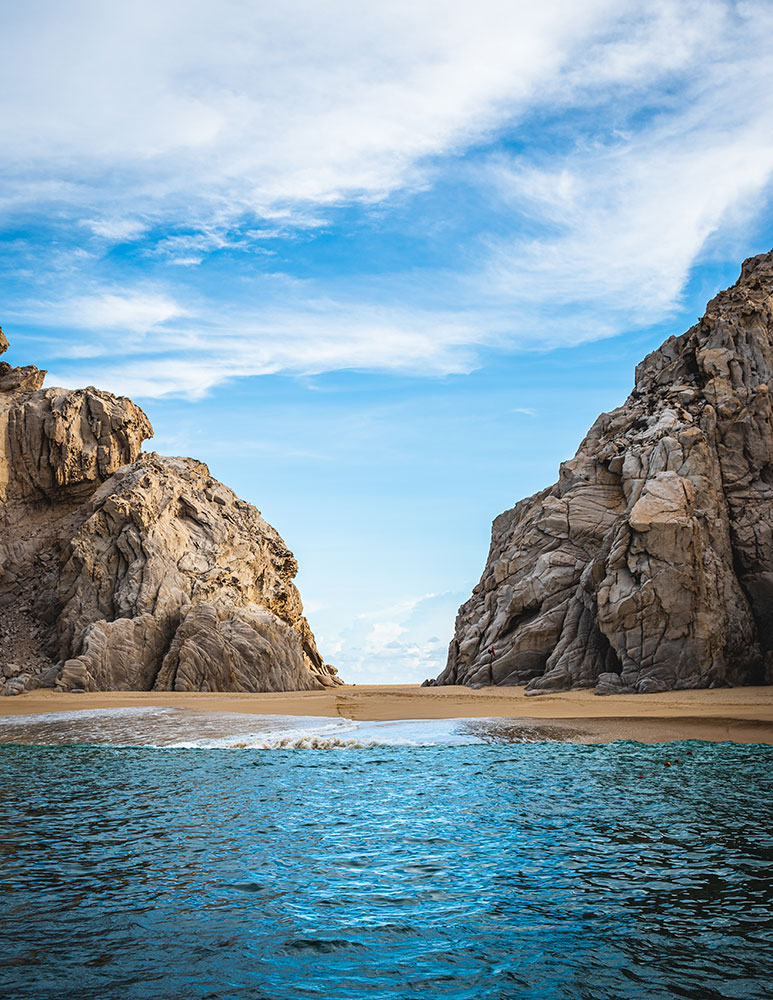
Divorce beach captured in Cabo San Lucas.
So, when COVID 19 hit and travel was no longer an option, Brett’s passion blossomed, as he started experimenting with self-portraits, which led to photographing friends. Sharing his work on Instagram attracted client requests, which eventually led him to establish Brett Brown Photography. Life drastically changed when Brett appeared on the Netflix series Love is Blind and married his wife Tiffany.
Bringing the Basics to the Fore
“I am very much an autodidact,” says Brett. His career outside of photography is in 3D art & design where he worked in the video games and footwear design industry. He notes that most of what he knows professionally is self-taught, by reading blogs and watching a lot of YouTube videos.
“With my background in 3D modeling, I already knew the basic principles of lighting as well as things like form and composition. I also had a lot of experience using photoshop in my career. So, when it came down to learning how to take good photos, it was more of a technical exercise than anything.“
Portrait of Brett’s wife, Tiffany.
Choosing the Right Gear
We asked Brett what made him decide to choose a Nikon for his first camera. He says that Nikon was always top of mind, having remembered the commercial’s he’d seen on TV as a kid.
“I think they subconsciously registered somewhere in my brain, so when I started looking for a camera, Nikon was the first brand I looked at. As I learned more about the various camera models and saw the picture quality and features, I was sold.”
Moving to Mirrorless
Migrating to mirrorless has been a game changer for Brett. Having resisted the initial move, once he made the leap to mirrorless, there was no going back. “Being able to see what my photo would look like with the correct exposure through my viewfinder was huge. I can shoot so much faster and it makes the process much more intuitive,” he says.
In the two years he’s been shooting mirrorless, Brett went from the Z 5 to the Z 6 to the Z 6II. “Each camera was great for my needs at the time,” he says, “but once I started working with video, the benefits of upgrading to the Z 6II became apparent. The photo quality is excellent and the increase in the number of autofocus points is great.”
“Because I’ve been doing more video work recently, I’ve enjoyed the 4K resolution with no crop at 30 fps. I do a mix of photo and video, so I needed a camera that was great at both and the Z 6II is perfect for my needs,” he adds.
Other favorite features of the Z 6II include the built-in VR image stabilization, especially when he’s shooting video and using the SnapBridge app to download images directly to his phone to quickly share them on social media.
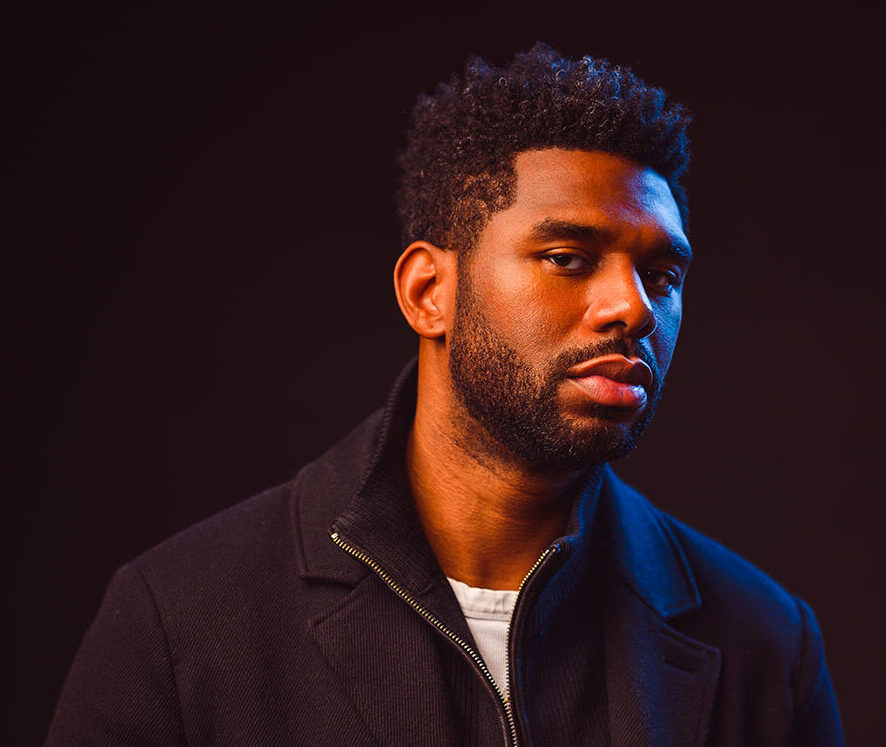
Model: Jarren Simmons.
“I’m loving the f/1.8 versions of both the 50mm and 85mm NIKKOR Z lenses. Both are very light and compact which makes them great for traveling or shooting on the go. The focus is sharp with no distortion and the bokeh is beautiful.”
Stepping In front of the Camera
“I guess I started doing self-portraits primarily because it allowed me to learn and work totally at my own pace. If I have an idea or just want to try something new, it’s much easier to get in front of the camera myself instead of hitting someone up and hoping they’re available and patient enough for me to experiment. I also think it’s a way to generally get more comfortable with yourself. I also love the surprise element when people see a portrait of me and ask who took it and I tell them I shot it myself!”
Self-portrait of Brett and his wife, Tiffany.
Turning his Camera on Others
Having a great eye for posing, composition, color and lighting is so important to a portrait photographer. “I think these attributes all work together to make a great picture. It’s what separates just mindlessly snapping the shutter from taking great photos. Each attribute takes time and repetition to become great at. I’m definitely aware of all of these not only when I take a picture but when I’m editing as well.” Brett explains.
Brett does admit that posing is a different type of skill—one that develops from experimenting with self-portraiture, learning how to pose yourself. “If you’re shooting someone else, being comfortable giving direction and making them feel comfortable takes practice and most importantly, people skills. Outside of the technical ability I think making your subject feel comfortable is a big part of getting a great portrait,” he says. Brett adds: “One of the things I enjoy most about photography is that it gives me the chance to work with people in real time which is a nice change of pace from my usual work schedule”.
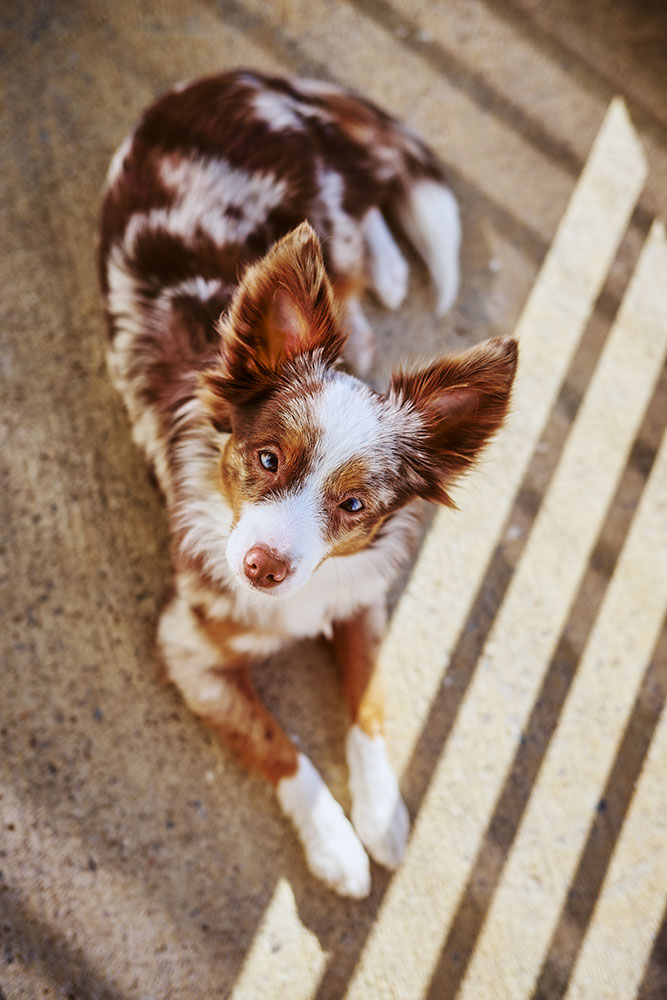
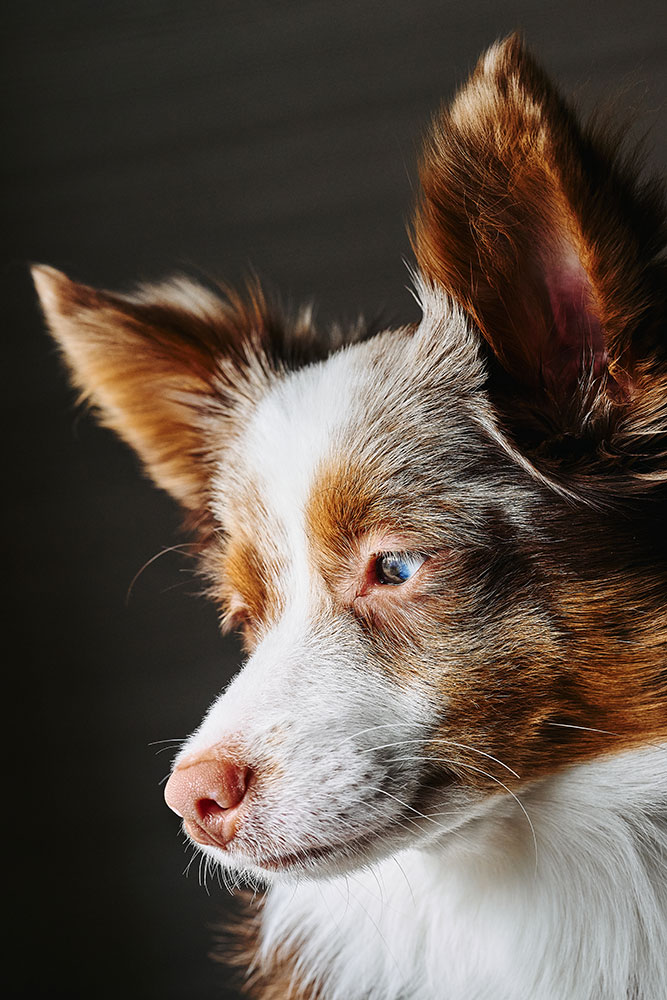
I bought a Z f to capture personal moments in my life, and this is a great example. This was a casual shot taken during my morning “coffee on the porch” routine. My dog was lying in the sunshine reflected from the glass door of our house, and I liked how the reflections and shadows fell on the ground. Nikon Z f, NIKKOR Z 40mm f/2 lens, 1/1000 second, f/2.8, ISO 125.
I bought a Z f to capture personal moments in my life, and this is a great example. This was a casual shot taken during my morning “coffee on the porch” routine. My dog was lying in the sunshine reflected from the glass door of our house, and I liked how the reflections and shadows fell on the ground. Nikon Z f, NIKKOR Z 40mm f/2 lens, 1/1000 second, f/2.8, ISO 125.
Photographer and filmmaker Chris Hershman has been a Nikon shooter since the days of the D70S. Currently based in Nashville, Tennessee, Chris spends his days creating video content for a marketing agency, but in his spare time, he enjoys shooting candid portraits—both human and animal. We sat down with Chris to learn more about his approach to personal work and find out how the Z f has transformed how he captures meaningful moments.
“My main camera kit for work is a Nikon Z 8 and Z 6 II, with the “trio” of f/2.8 mirrorless zoom lenses: NIKKOR Z 14-24mm f/2.8 S, NIKKOR Z 24-70mm f/2.8 S and NIKKOR Z 70-200mm f/2.8 VR S lenses. Outside of professional use, my goal has been to capture as much as I possibly can on my cameras, rather than constantly getting out my cellphone. That’s what led me to purchase a Z f—a feeling that I wanted to capture some of the most important casual moments in my life on a proper camera. Basically, I want to move from always carrying my gear in a backpack to carrying it in a fanny pack!”
During a quiet moment, our dog Murphy looks out of the window at our local dogpark, wishing he was playing. This was shot with a Z 105mm f/2.8. It’s really sharp and shows all the fine hairs on his face. Nikon Z f, NIKKOR Z 105mm f/2.8 S lens, 1/250 second, f/11, ISO 2200.
Chris explains how the Z f has inspired a new style of shooting in his “off-duty” moments:
“Compared to my main kit, with the Z f, I’m looking to get artful, authentic, and more playful images. I’ve found that the Z f enables experimentation in a way that I really enjoy. I’m reaching for my F mount lenses a lot with the FTZ II adapter, like my old AF DX Fisheye-NIKKOR 10.5mm f/2.8G ED, and a manual focus NIKKOR 50mm f/1.2, to get a distinctive look. I use the Z f’s focus peaking feature with the 50mm f/1.2, which is great for manual focus, even when I’m shooting at wide apertures. I love the Z f’s black and white mode, too. Especially for available light portraits on the 50mm f/1.2.”
Editors’ note: Focus Peaking is a feature in Nikon Z mirrorless cameras that helps with accurate manual focus. When Focus peaking is activated, high-contrast, in-focus areas in a scene are indicated with a colored highlight.
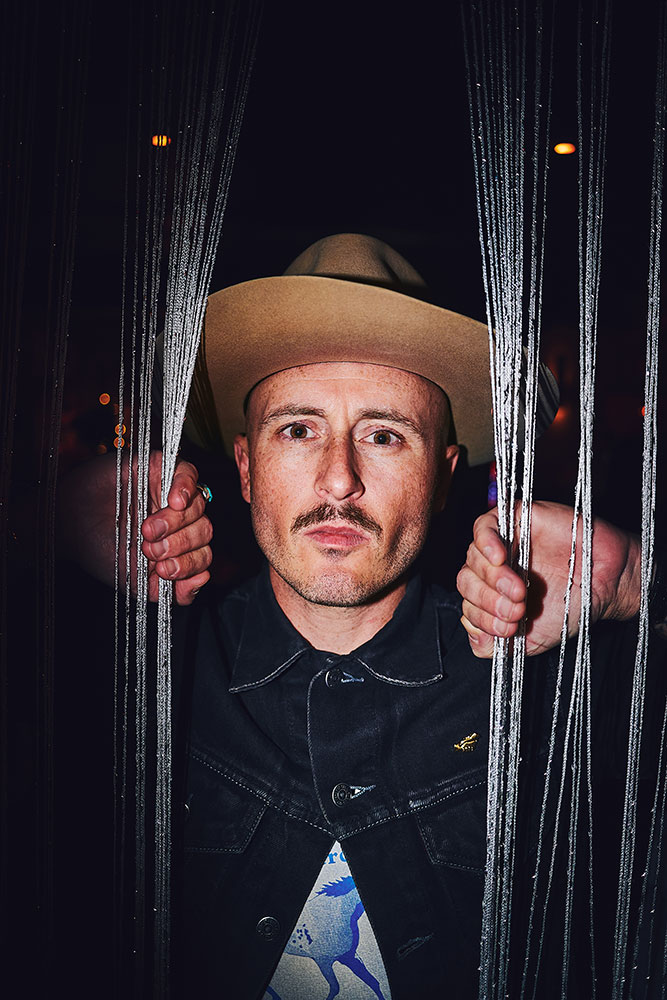
My buddy Micah invited me out to see some live music in Nashville, and I took this portrait at the venue. This was taken with the Z 26mm f/2.8 and SB-300 Speedlight. I snooted the light from the flash with my hand to get a strong vignette. This was a quick “one and done” shot, but I like how it turned out, with Micah peering through the curtain. Nikon Z f, NIKKOR Z 40mm f/2 lens, 1/60 second, f/2.8, ISO 250.
While Chris uses manual focus a lot, there are times when he needs the advanced animal and human eye-detection autofocus of the Z f:
“I moved to Nashville this year, and it’s a big dog city, so I’ve started a project taking pictures of dogs and their owners. I’ve been shooting a lot with the Z 26mm f/2.8, getting up really close to dogs running around, and you need good autofocus for that!”
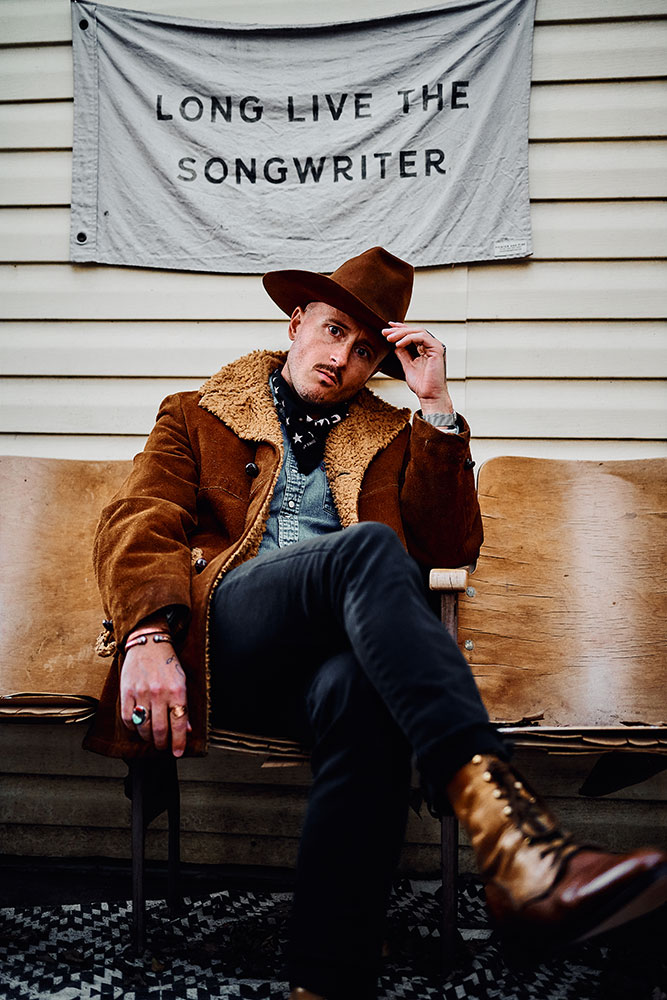
Another portrait of Micah at his home. We were trying to create a storytelling image of an artist in his writing environment. He has these cool stadium seats right outside his front door–this shot was almost an outtake at the end of the session, but it ended up being one of our favorites. Nikon Z f, NIKKOR Z 40mm f/2 lens, 1/250 second, f/2, ISO 1250.
While his professional work is all digital, Chris is a keen film shooter in his spare time. He explains how the Z f combines the best aspects of both kinds of shooting:
“I’ve always enjoyed the process of shooting film because it slows you down to really think about your settings. It feels like with the Z f, the designers took what was great about film cameras, and used that to make a really practical digital camera for a modern photographer. There’s something about having mechanical dials that just make you want to turn them, and I’ve found that it gets me in the mindset to expose for a sharable image straight away, rather than relying on post-processing the RAW (NEF) file to get an exactly graded shot, which is what I’d do for my professional work. I use the SnapBridge app. and I have it set up so that as soon as I take a picture with the Z f, it’s automatically transferred to my phone. That’s such a different workflow compared to my usual day-to-day—it doesn’t feel like work anymore. And I think it makes me a better photographer, to be honest.
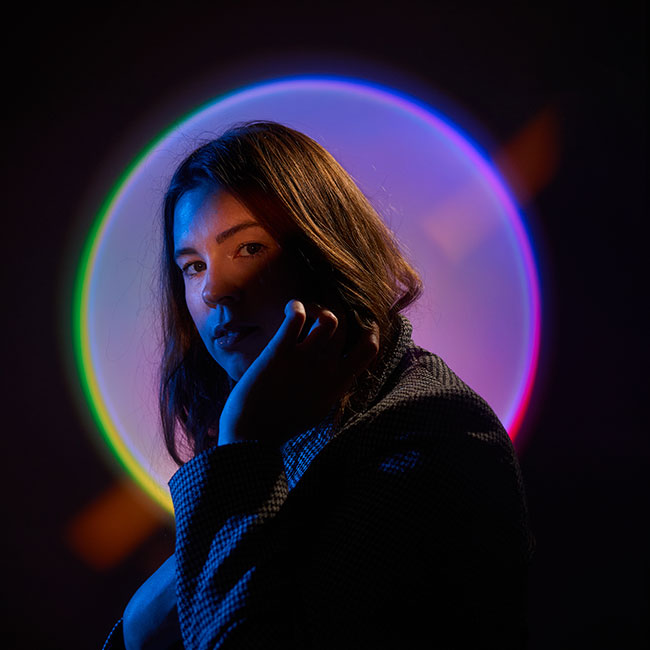
This is my wife, taken in our house. I wanted to create a really colorful image with bold contrast, and I knew I wanted to shoot in the square format. I used an LED sunlamp behind her, cycling through different colors as we shot. Strobes provided the main illumination with a light modifier to create a strip of light across her eyes. Nikon Z f, NIKKOR Z 40mm f/2 lens, 1/200 second, f/2.8, ISO 640.
“If I shoot film nowadays, it’s to stay inspired and separate the experience from my day-to-day professional work. The Z f isn’t going to replace my Z 8 for commercial work, but when I clock off for the day, that’s when I’ll reach for the Z f. It’s the best of both worlds – the experience of film shooting, with the convenience and quality of digital. And it looks good around my neck!”
This was taken enroute between Nashville and Chicago. I had the Z f on my lap the whole time to document the trip. I was lucky enough to have the camera set up for a fast shutter speed and snapped this image from the moving car as I noticed the birds taking off. I shot this using the Deep Monochrome Picture Control. Nikon Z f, NIKKOR Z 40mm f/2 lens, 1/2000 second, f/4, ISO 100.
Robert Vasquez explains why getting to know your subjects is just as important for successful portrait photography as gear and technique.
Portrait photographer Robert Vasquez first picked up a camera in 2009. After a breakthrough commission to shoot a high-profile TV host, he left his job in newspaper publishing and moved into full-time photography. In addition to weddings and travel photography, he has worked with some of the best-known actors, television personalities and musicians in Latin America.
Robert started his journey with a D40 DSLR, but he currently uses a variety of Nikon Z system mirrorless equipment:
In my camera bag, I carry two cameras: the Nikon Z 6II and Z 7II. My lenses include the NIKKOR Z 14-24mm f/2.8 S, NIKKOR Z 24-70mm f/2.8 S, NIKKOR Z 70-200mm f/2.8 S, NIKKOR Z 50mm f/1.2 S, NIKKOR Z 50mm MC f/2.8 S, NIKKOR Z 35mm f/1.8 S, and NIKKOR Z 85mm f/1.8 S. Additionally, I have polarized ND and CPL filters and two flashes.
Although he uses multiple NIKKOR Z lenses for his work, Robert often finds himself relying on just two—the 70-200mm f/2.8 and the 50mm f/1.2, almost always shooting wide open, to maximize background blur:
Depending on the situation and the style I aim to achieve, both lenses offer distinct advantages—the 70-200mm provides a wide zoom range, allowing me to compose portraits from various distances without changing lenses. Its wide aperture creates a beautiful background blur. On the other hand, the 50mm f/1.2 excels for portrait photography, especially in low-light conditions.
When shooting outdoors, I typically use the widest possible aperture setting. This allows me to separate the subject from the background effectively. I keep ISO sensitivity low, and only shoot at shutter speeds over 1/250 seconds to make sure that there’s no motion blur in my images.
The human factor
Becoming a successful creative isn’t just about gear and practical technique, of course. Robert explains that to make a living as a wedding and portrait photographer, “soft skills” are at least as important as technical mastery:
Photography is more than just capturing beautiful images with good composition and excellent lighting; it involves the human factor. To excel as a portrait photographer, you need qualities like emotional understanding, empathy, patience, communication skills, the ability to capture the essence and personality of the subject, and creativity in creating unique and compelling compositions. Continuous practice and a commitment to improvement are also essential. In addition, it’s important to maintain good relationships with your clients, and stay up-to-date with industry trends.
When it comes to making his subjects feel comfortable, Robert stresses the importance of two-way communication, explaining his process as a photographer, and asking questions to understand what his subjects want to get out of the session:
Clear and friendly communication is essential. I explain my process and assure them that I am there to capture their best self. I ask questions to understand their preferences and break the ice, tailoring the session to their comfort. I once photographed the Mexican acting superstar, Kate del Castillo, for a magazine cover. She was tired from traveling, and when she arrived on set, the atmosphere was a bit tense. I decided to turn my camera off and told the team to take a short break. I used the time to get to know her better. We had coffee and chatted for about 20 minutes about her career. Even though the conversation was brief, she became much more comfortable, and she was more relaxed when we resumed the shoot. The pictures I got that day were among the best I’ve ever captured.
Robert’s 5 tips for successful portrait photography:
Get to know your equipment—become familiar with your cameras, lenses, and all your other accessories.
Before you start experimenting with flash or studio lighting, practice with natural light first to understand how it affects portraits. Learn about soft and diffused light on cloudy days and how to use the warm sunlight during “golden hour.”
Always ensure that you focus on your subject’s eyes.
Experiment with shooting at wide apertures. This will help achieve a pleasing background blur that makes your subject stand out.
Make time to build a good rapport with your subject—it will be reflected in the final image.
Stay Connected
Get fresh inspirational content delivered straight to your inbox.